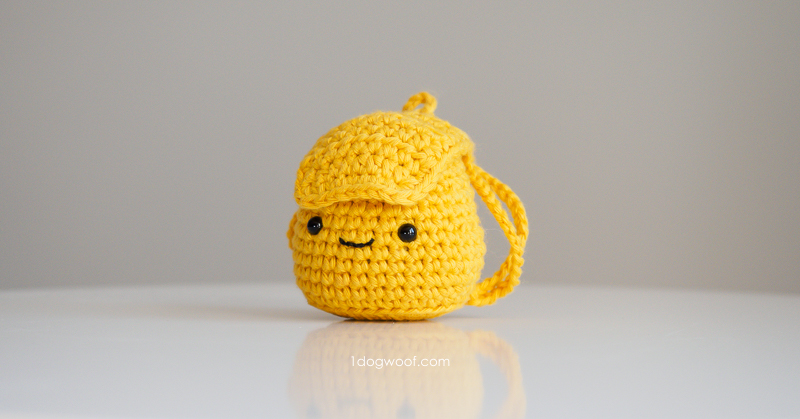
I’m such a bag lover there was no way I was going to finish this advent without at least one bag or backpack. My current obsessions are drawstring backpacks and backpack totes, so it’s only fitting that I make a little amigurumi backpack to share!
——————————————
Purchase the PDF from Ravelry or Add to your queue
——————————————
Let’s go step by step through how to make this amigurumi bag!
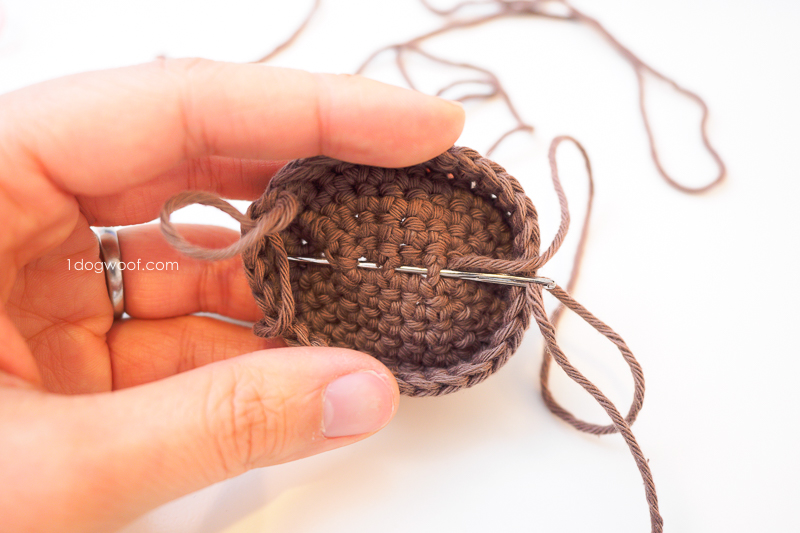
The body of the backpack is similar to many of the other amigurumis in that they’re worked in the round. Unlike the others, the base of this body is not a circle, it’s an oval. So you don’t start with a magic circle; you start with chain stitches and then join at the end of each round. When you make a based with chain stitches, sometimes there are a few gaps at the bottom where the stitches are bit stretched. I like to weave the beginning tail through those to close them up and prevent stuffing from coming out.
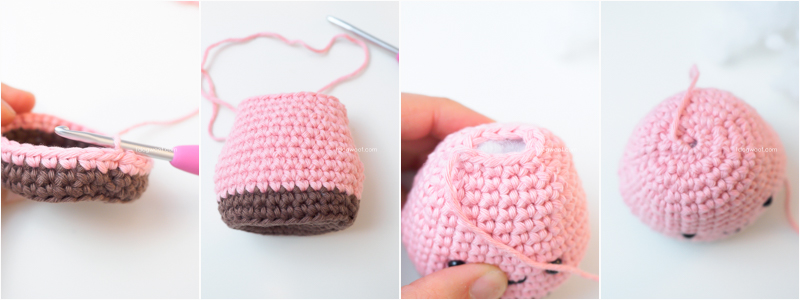
I chose to mimic a leather bottom for my second backpack, so I changed colors 2 rounds after working in the back loop. The instructions below indicate where the color change is, but you can always make it in a solid color too.
Since the top of the bag body will be covered by the top flap, it doesn’t need to close completely. I used the amigurumi close technique, but because there’s 12 stitches there, you won’t be able to pull it completely tight. Also, do not overstuff the bookbag. You want to see the shape, but keep it a little loose at the top so the top flap closes over it easily.
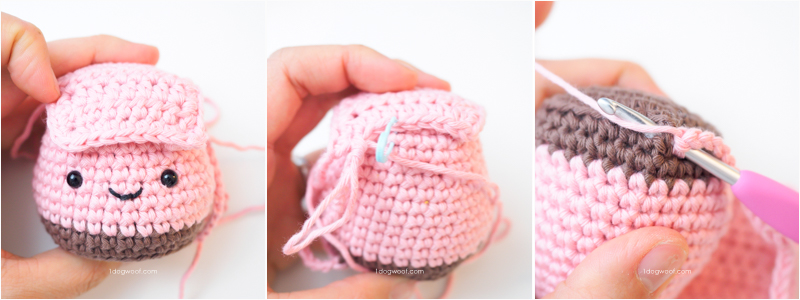
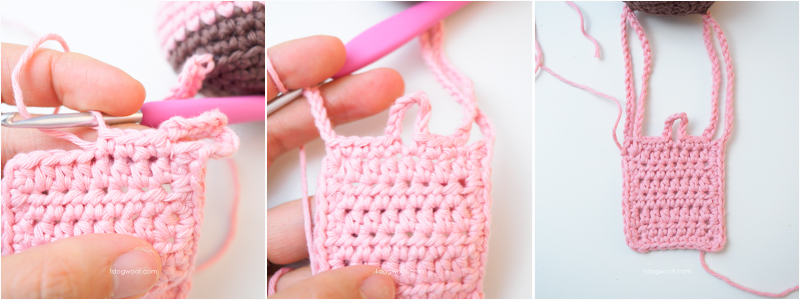
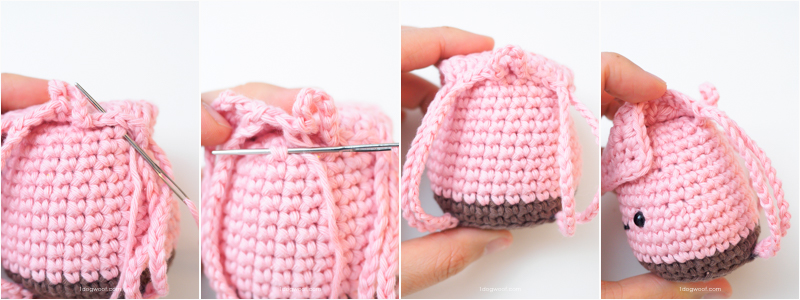
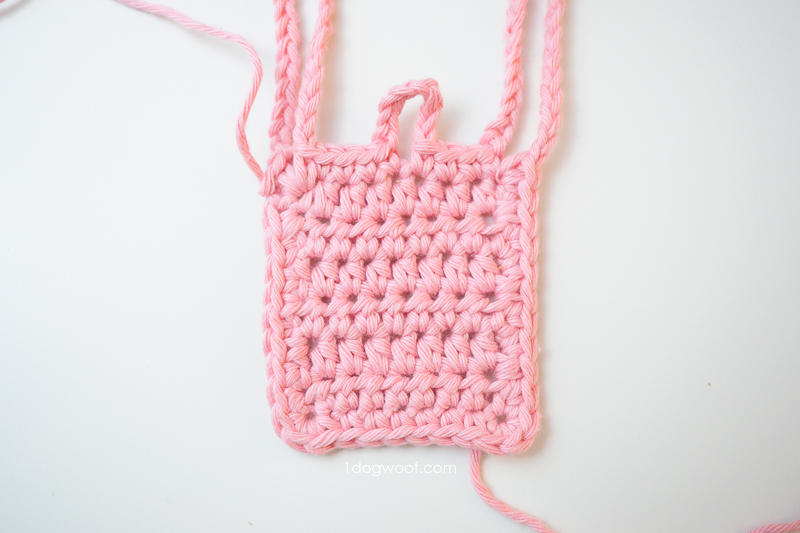
The hardest part about this backpack is the top flap and straps. Once the body is complete, the flap and straps are worked in one piece and then sewn to the bag body. You’ll start with a small rectangle, just half double crochets worked in rows. Then you’ll work a single crochet border evenly around 3 sides of the rectangle – the left, the front and the right. The last side of the rectangle will face the back and that’s where all the detail come in. When you get to the first back corner, you’ll start working your chain stitches to create the strap. Then connect it to the bottom of the bag body in the same way the noodles are connected to the meatball in the Amigurumi Spaghetti. There’s a video too if you need it. I found it useful to secure the flap in place temporarily with a stitch marker while I made the straps so I didn’t get the straps tangled.
After connecting the strap, work chain stitches back up to the flap, and start working across that last side. Stop in the middle, work chain stitches to create the handle, then continue working single crochet to the end of the row. You’ll then repeat the chain stitches to create the other strap and connect it to the other side of the bag. Work back up with chain stitches and secure the last stitch in the same corner that you started the whole border. You’ve now worked around all 4 sides of the little rectangle and created the top flap of the bag.
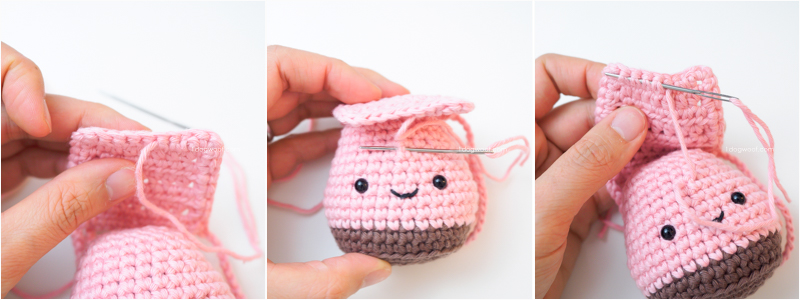
Now take the beginning tail, weave it under a few of the single crochet border stitches to the middle of the front of the flap. Sew through a single stitch on the bag body and then weave in the rest of the tail. This hold the front of the flap down on the bag.
Use the end tail to sew the back side of the flap to the top back of the bag body. Pick a round where you want to attach the back side of the flap and use a whip stitch to sew it in place. Be careful not to sew the handle down – you’ll want to keep that free so it can be used if you want to make this bag into a keychain!
Supplies
- MC: Paintbox Cotton Aran Blush Pink (~0.32 oz) or other yellow
- C1: Paintbox Cotton Aran Coffee Bean (~0.07oz) or other brown
- F/3.75mm crochet hook
- Cluster fiberfill
- 6mm safety eyes
- scissors
- embroidery thread or lightweight yarn in Black
Abbreviations
- st(s) – stitch(es)
- sl st – slip stitch
- ch – chain stitch
- sc – single crochet
- hdc – half double crochet
- inc – increase: work 2 sc in same st
- dec – decrease: work 2 sc together
- BLO – back loop only
Pattern Notes
- Rounds in bag body are worked with a seam and joined with a seamless join.
- Eyes are placed approximately 1.0-1.25 inches apart.
- Amigurumi can be closed using this technique.
Amigurumi Backpack Instructions
BODY
- Worked in seamed rounds.
- Start with C1.
Round 1: Ch 6. Starting from the 2nd ch from hook, work 4 sc, 3 sc in last next ch, 3 sc, 2 sc in last ch.. Join to first sc with sl st. (12)
Round 2: Ch 1. Work 1 inc, 3 sc, 3 inc, 3 sc, 2 inc. Join to first sc with sl st. (18)
Round 3: Ch 1. Work [1 sc, inc], 3 sc, [1 sc, inc] 3x, 3 sc, [1 sc, inc] 2x. Join to first sc with sl st. (24)
Round 4: Ch 1. Work [2 sc, inc], 3 sc, [2 sc, inc] 3x, 3 sc, [2 sc, inc] 2x. Join to first sc with sl st. (30)
Round 5: Ch 1. Work 1 sc in BLO of each st around. Join to first sc with sl st. (30)
Round 6: Ch 1. Work 1 sc in each st around. Join to first sc with sl st. (30)
Round 7: Switch to MC. Ch 1. Work 1 inc, 13 sc, 2 inc, 13 sc, 1 inc. Join to first sc with sl st. (34)
Round 8-10: Ch 1. Work 1 sc in each st around. Join to first sc with sl st. (34)
Round 11: Ch 1. Work 1 dec, 13 sc, 2 dec, 13 sc, 1 dec. Join to first sc with sl st. (30)
Round 12-13: Ch 1. Work 1 sc in each st around. Join to first sc with sl st. (30)
Round 14: Ch 1. Work [dec, 1 sc], 1 dec, 7 sc, [dec, 1 sc] 2x, 1 dec, 7 sc, [dec, 1 sc] Join to first sc with sl st. (24)
Round 15-16: Ch 1. Work 1 sc in each st around. Join to first sc with sl st. (24)
- Add eyes between Rounds 10 and 11.
- Sew mouth between Rounds 9 and 10, centered between the eyes.
Round 17: Ch 1. Work [1 sc, dec], 6 sc, 1 dec, 2 sc, 1 dec, 6 sc, [dec, 1 sc]. Join to first sc with sl st. (20)
Round 18: Ch 1. Work [1 sc, dec], 4 sc, 1 dec, 2 sc, 1 dec, 4 sc, [dec, 1 sc]. Join to first sc with sl st. (16)
Round 19: Ch 1. Work [1 sc, dec], [2 sc, dec] 3x, 1 sc. Join to first sc with sl st. (12)
- Stuff the amigurumi.
- Fasten off, close with amigurumi close. The close will not be super tight.
BACKPACK FLAP
Row 1: Start with a long tail. Ch 10.
Row 2: Starting from the 3rd ch from hook, work 8 hdc across. Turn.
Row 3-6: Ch 2. Work 1 hdc in each st across. Turn.
Row 7: Ch 2. Work 1 hdc in each st across. Do not turn.
Row 8: Ch 1. (Work sc evenly around 3 sides of the rectangle.) Work *9 sc along first side, 3 sc in corner, 6 sc on second/front side, 3 sc in corner, 8 sc along 3rd side.)
Work 2 sc in corner. Ch 18, work ch around bag body at Round 5, ch 18. Work 1 sc in same st.
Work 1 sc in each of next 3 sts. Ch 8.
Work 1 sc in next st.
Work 1 sc in each of next 3 sts.
Work 1 sc in same st as first st of *. Ch 18, work ch around bag body at Round 5, ch 18. Work 1 sc in same st. Join to first first sc with sl st.
Fasten off with long tail.
- Weave beginning tail through 3 sts on the front of the flap and then join to the body between Rounds 13 and 14, then weave tail through the other 3 sts on the front of the flap. Secure tail and weave in ends.
- Use end tail to sew the flap across the top back of the backpack body. Secure the tail and weave in ends.
I love how customizable this bag is. Since the body is just seamed rounds, you can add different designs and colors to it to match your own favorite backpack!
Tag your creations with the hashtag #AmigurumiAdventCAL on social media, and check out my other amigurumi patterns on the Amigurumi Advent intro post!
Check out my pattern shops on Ravelry and Etsy where you can purchase printable PDFs of my latest crochet patterns. These PDFs are formatted without comments or ads, and have instructional photos at the bottom for optional printing.
I sometimes include affiliate links in my supply lists. Purchasing from these merchants earns me a small commission with no extra cost to you, and goes towards supporting One Dog Woof.
Please be respectful and do not sell or distribute this pattern in any way, especially as your own. Instead, share the original blog post link! You can sell finished products made from this pattern by giving credit to One Dog Woof as the pattern designer and linking to the blog post. If you have any questions regarding distribution or translation of this pattern, please see my Terms of Use. Thank you for your consideration!



Hi – I do not understand the first row instructions. “Round 1: Ch 6. Starting from the 2nd ch from hook, work 4 sc, 3 sc in last next ch, 3 sc, 2 sc in last ch.. Join to first sc with sl st. ”
Does this mean work 4 sc in second chain from hook, 3 sc in next chain, sc in the next 3 chains, and then 2 sc in the last chain? Reading it this way would mean you need to work into 6 chains and starting on the second chain from hook, you only have 5 chains to work with? Thank you for your help. I don’t do Facebook or I would join the CAL group there and ask.
Never mind I think I figured it out! 🙂 sorry for all the comments! Thank you for all of these free patterns.
So super cute and great instructions! Thanks so much for your lovely tutorials!
Hi, can you let me know how is round one done? I’m confused over that line too.
Can you explain round 3 it is a little confusing
Do the chain ones count and slip stiches count as stiches?
In round 3 what does it mean by x??
very cute backpack
Hi! How did you figure out the first row?