
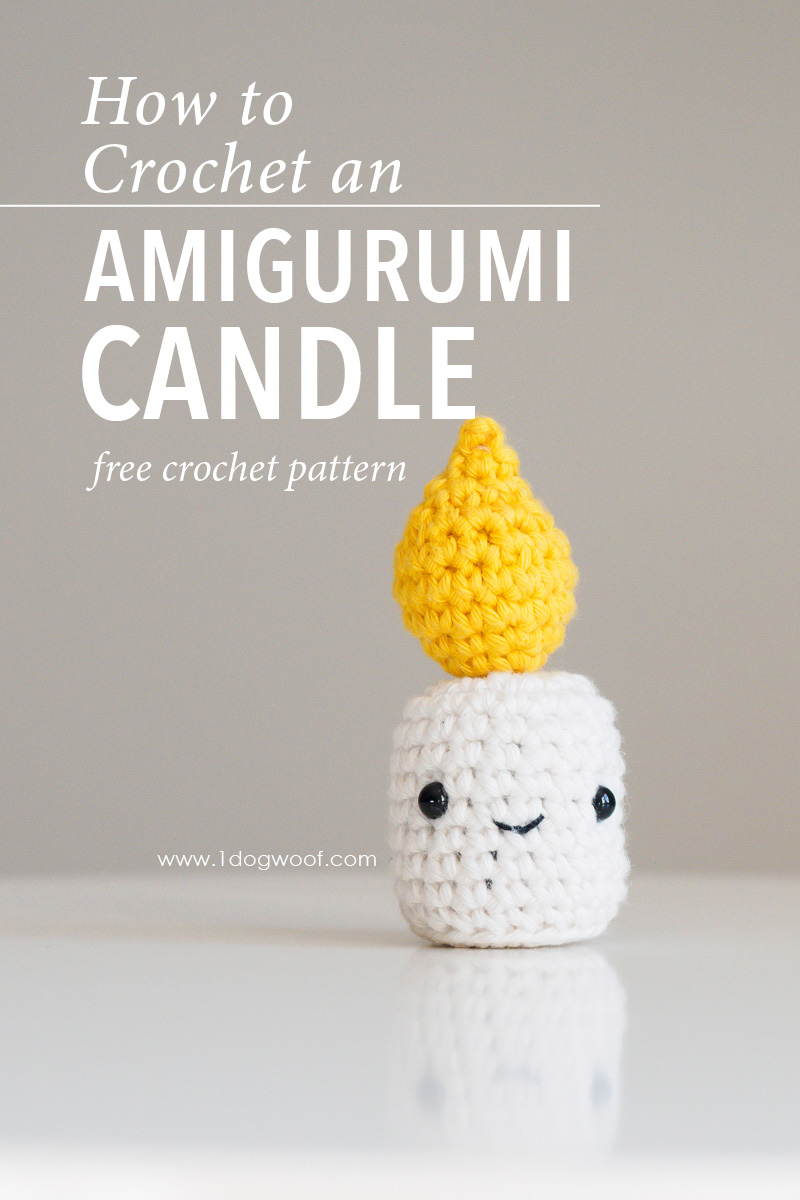
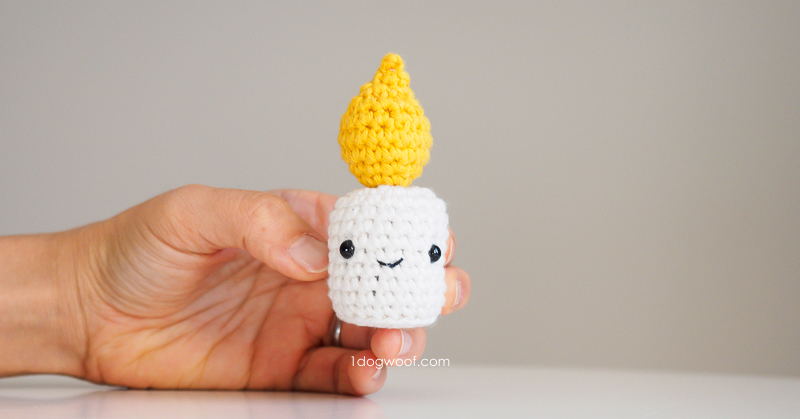
What day of the #AmigurumiAdventCAL are we on now? We just celebrated Thanksgiving, and with the busyness of the holiday, I’m keeping it simple with this little amigurumi candle. It’s quick to whip up, and pairs perfectly with the Spaghetti and Meatballs amigurumi for a fun little tablescape!
——————————————
Purchase the PDF from Ravelry or Add to your queue
——————————————
This candle is super simple to make – it consists of 2 parts, the taper and the flame. The taper, or body, is worked in seamed rounds to keep it completely even, and you can make it as short or as tall as you want. Just make sure that however tall or short you make the body, you attach the eyes right at, or just below, the half way point for maximum cuteness. This is a great way to use up leftover bits of yarn!
The flame is worked in continuous rounds to intentionally give it that lopsided look. As you work closer to the top, you’ll see in the pattern that you are not finishing the round completely before moving on to the next stitch. That’s ok though, because the whole flame is just a continuous spiral all the way to the tip.
The tricky thing I found with this amigurumi is how to attach the flame to the taper. I wanted to sink the flame into the taper a bit so it’s not just perched precariously on top of the taper. To make the connection more secure, I think it’s best to use the beginning tail of the flame and sew it to the top of the taper, not just at one point, but sort of along the outside of the first round of 6 sts. If you pull your sewing tight, it should secure the flame to the taper pretty well.
I don’t have a video tutorial for this, but if you need any help on the magic circle, seamless join, stuffing, or making the face, you can check out the Amigurumi Flan video tutorial for all the basics!
Supplies
- Paintbox Cotton Aran Light Champagne (~0.21 oz) or other brown
- Paintbox Cotton Aran Mustard Yellow or other beige
- F/3.75mm crochet hook
- Cluster fiberfill
- 6mm safety eyes
- scissors
- embroidery thread or lightweight yarn in Black
Abbreviations
- st(s) – stitch(es)
- sl st – slip stitch
- ch – chain stitch
- sc – single crochet
- inc – increase: work 2 sc in same st
- dec – decrease: work 2 sc together
Pattern Notes
- Rounds in the flame are worked continuously with no seams. Because you’re working continuously around, the last few rounds may seem incomplete, but continue following the pattern all the way to the close.
- Rounds in the body are joined in the round.
- Eyes are placed approximately 1.0-1.25 inches apart.
- Amigurumi can be closed using this technique.
Amigurumi Candle Instructions
CANDLE BODY
- Worked in seamed rounds
- Worked in WHITE
Round 1: Work 6 sc into a magic circle. Join to first sc with sl st. (6)
Round 2: Ch 1. Work 2 sc in each st around. Join to first sc with sl st. (12)
Round 3: Ch 1. Work [1 sc, inc] 6x around. Join to first sc with sl st. (18)
Round 4: Ch 1. Work 1 sc in BLO of each st around. Join to first sc with sl st. (18)
Round 5-12: Ch 1. Work 1 sc in each st around. Join to first sc with sl st. (18)
- Add eyes between Rounds 8 and 9.
- Sew mouth between Rounds 9 and 10, centered between the eyes.
Round 13: Ch 1. Work [1 sc, dec] 6x around. Join to first sc with sl st. (12)
- Stuff the body.
Round 14: Ch 1. Work 6 dec. (6)
- Fasten off, close, and weave in ends.
FLAME
- Worked in continous rounds
- Worked in YELLOW
Round 1: Start with a long tail. Work 6 sc into a magic circle. (6)
Round 2: Work [1 sc, inc] 3x around. (9)
Round 3: Work [2 sc, inc] 3x around. (12)
Round 4: Work [1 sc, inc] 6x around. (18)
Round 5: Work 1 sc in each st around. (18)
Round 6: Work [4 sc, dec] 3x around. (15)
Round 7:Work 3 sc, 3 dec, 3 sc, 1 dec. (10) *This is an incomplete round, but as you’re working continuously, it will blend into the next round.
- Stuff the body.
Round 8: Work 2 dec, 2 inc, 2 dec. (6) *This is an incomplete round, but as you’re working continuously, it will blend into the next round.
Round 9: Work 2 dec, 1 inc, 2 dec. (5)
- Fasten off, close, and weave in ends.
Use the beginning tail of the flame to sew the flame onto the body. Secure the tail and weave in ends.
If you enjoyed this pattern and are showing it off to the world, make sure to tag me @1dogwoof with the hashtag #AmigurumiAdventCAL. I can’t wait to see all your creations! You can also head over to the Amigurumi Advent Calendar intro post to see the entire collection!
Check out my pattern shops on Ravelry and Etsy where you can purchase printable PDFs of my latest crochet patterns. These PDFs are formatted without comments or ads, and have instructional photos at the bottom for optional printing.
I sometimes include affiliate links in my supply lists. Purchasing from these merchants earns me a small commission with no extra cost to you, and goes towards supporting One Dog Woof.
Please be respectful and do not sell or distribute this pattern in any way, especially as your own. Instead, share the original blog post link! You can sell finished products made from this pattern by giving credit to One Dog Woof as the pattern designer and linking to the blog post. If you have any questions regarding distribution or translation of this pattern, please see my Terms of Use. Thank you for your consideration!


Nine of these little guys and you have a kid-friendly menorah!
I noticed in the pattern you said BLO. What exactly does this stand for?
Hi! BLO stands for Back Loop Only, meaning you will be working your stitches in the back loop of the stitch 🙂