
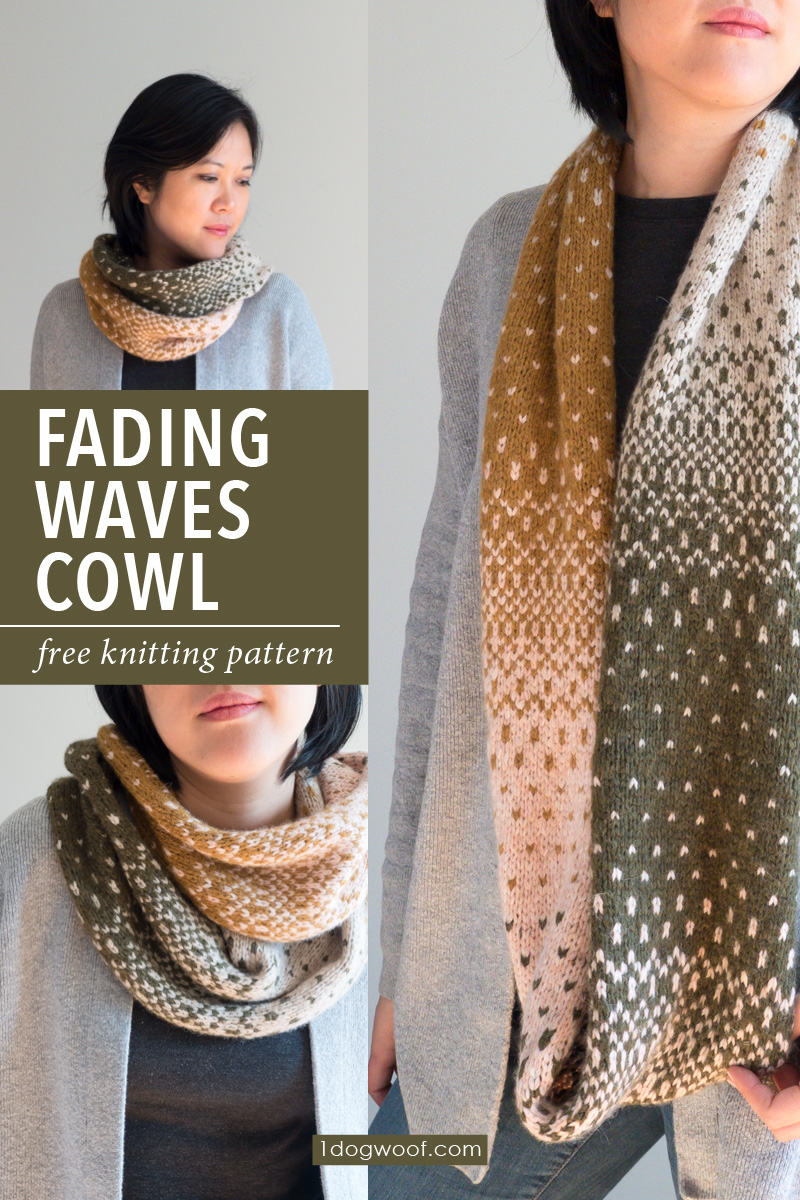
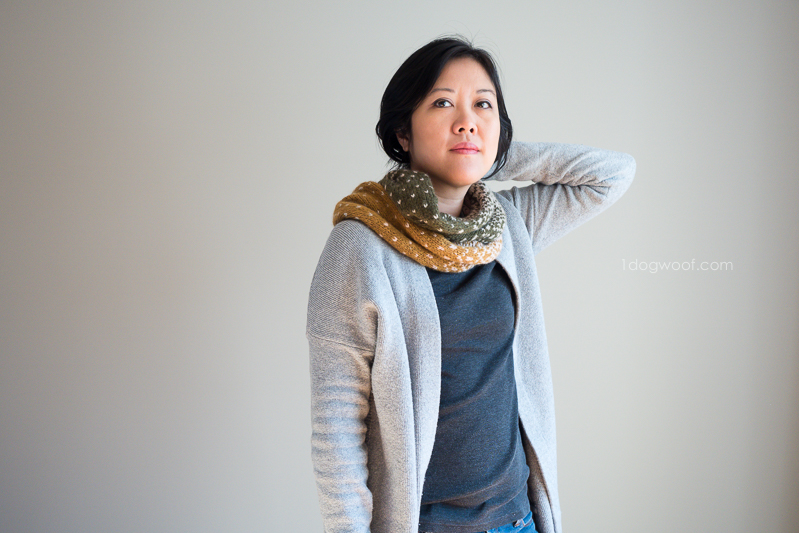
You may know that I’m a big fan of always picking up new skills and trying out new (to me) techniques for my projects. That’s why instead of a plain color blocked scarf, I decided to kick it up a notch and add in some stranded knitting, just for fun! The result is this beautiful Fading Waves fairisle cowl, where each of 4 colors blends softly into the next and around seamlessly.

This project is part of an ongoing collaboration with Lion Brand Yarn. This post contains affiliate links.
For this project, I used one of Lion Brand’s newest yarns, LB Collection Chainette, which is a mix of baby alpaca for softness and polyamide for strength. It’s lightweight and warm and feels great against your skin, which is kinda essential when you’re making a cowl, right? The colors are soft and muted, perfect for a sophisticated scarf with just enough color to brighten your day without needing sunglasses to look at it.
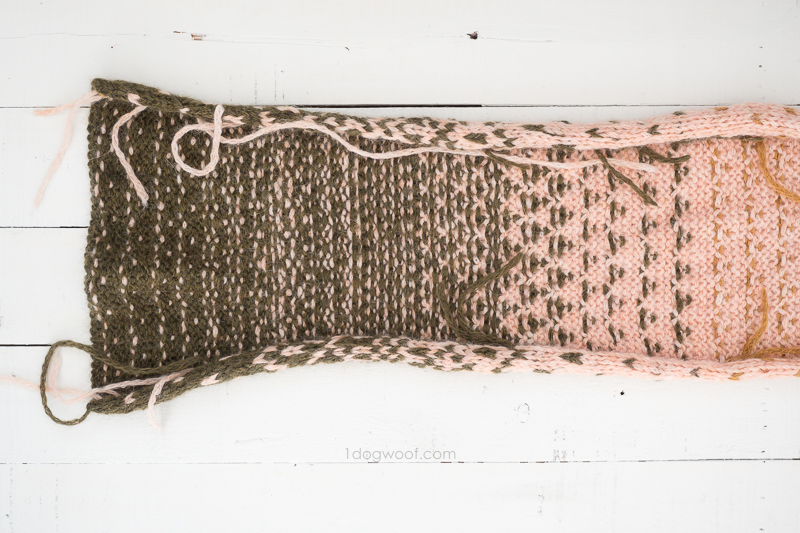
The cowl is made up of 4 distinct sections. Each of the 4 colors overlap each other, so that it actually feels like the fairisle and the colors are rolling through the cowl like waves. For example, I start off with an olive/pink combo, then it moves into pink/mustard, mustard/white, and then white/olive. The cowl is worked in rows, and by the end of the 4 sections, you’ll be working with olive again, so you can seam the two ends together using a Kitchener stitch variation to close the cowl up.

This scarf is labeled as an Intermediate pattern. I find the project to be a good practice ground for polishing several different skills. It’s challenging but also really enjoyable and hard to put down as you see the pattern develop. Overall, it’s incredibly satisfying to see the scarf grow, and know that your knitting skills are growing along with the pattern! You’ll need to know how to hold 2 colors at one time, and understand what color dominance means. It’s also a great exercise in managing tension and learning how to capture floats in the back of your work for both knit and purl stitches. Good thing the cowl is 4 repeatable sections. You’ll find that each section gets easier than the last.
I’ve compiled some stranded knitting links to help you learn the techniques needed in this project.
Knitting Resources
- If you need help with 2-handed fairisle knitting, I found Edie Eckman’s fairisle tutorial very helpful. She discusses how to hold 2 colors of yarn simultaneously, and how to catch floats for both right and wrong side rows.
- If you prefer Continental Knitting, you can check out Voolenvine Yarns Tutorial: Continental Stranded Knitting
- Be mindful of color dominance. If you’re working 2-handed, the dominant color is held in the left hand. I didn’t quite understand Edie’s explanation of color dominance on wrong side rows, so I always kept the dominant color in my left hand, and did not switch it for wrong side rows.
- You can read more about color dominance here.
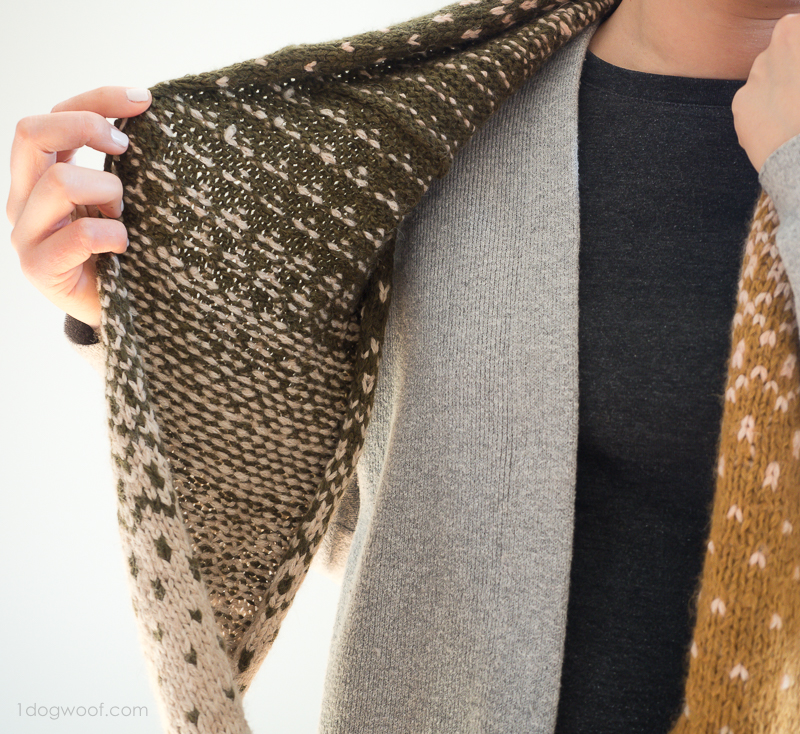
Because this project is worked in fairisle stockinette, the edges of the scarf/cowl will curl. Chainette is mostly natural fiber, so it blocked well, but I have noticed that the edges curl as I wear it, even after blocking. Much of the yarn is carried row to row, but there are places where you’ll need to cut the yarn and weave it in afterwards. Using Chainette or another natural fiber yarn also means that you can felt the ends together, which can save you time in not having to weave in ends.
The post includes the written pattern for the Fading Waves Cowl, and a simple color chart if you’re more of a visual person. You can also purchase an inexpensive PDF from Etsy, Ravelry, or LoveKnitting to get all the information below in an easily printable and downloadable format. The PDF has a full page color chart with added symbols for easier black & white printing.
——————————————
Add to your Ravelry queue or add directly to your cart
Get the kit from Lion Brand Yarn
——————————————
 Save this on Pinterest!
Supplies
- Yarn A: Lion Brand LB Collection Chainette Yarn (50g/1.75oz, 131yds/120m) in Olive
- Yarn B: Lion Brand LB Collection Chainette Yarn (50g/1.75oz, 131yds/120m) in Pink
- Yarn C: Lion Brand LB Collection Chainette Yarn (50g/1.75oz, 131yds/120m) in Mustard
- Yarn D: Lion Brand LB Collection Chainette Yarn (50g/1.75oz, 131yds/120m) in Beige
- US 10/6mm knitting needles, either straight or circular
- tapestry needle
- scissors
Abbreviations
- st(s) – stitch(es)
- K – knit
- P – purl
- BC – background color
- AC – accent/dominant color
Pattern Notes
- Skill level: Intermediate for color work
- Gauge: 18 sts and 21 rows in 4 inches. (Gauge can vary since the scarf is not size-specific.)
- One size only
- Width: approximately 11 inches
- Length: 56 inches unjoined and laid flat.
- Yardage used: Approximately 115 yds per color
- If you find your tension is too tight through the colorwork, moving up a needle size may help.
- Curling along the edge of the cowl is expected. Laying the cowl flat and blocking before joining the ends will help with the curling, but the sides may curl again over time.
- The Fading Waves Cowl is made by repeating a fairisle pattern 4 times, with the accent color from one repeat becoming the background color in the next repeat.
- Section 1: Yarn A is the background color (BC), yarn B is the accent/dominant color (AC).
- Section 2: Yarn B is the background color (BC), Yarn C is the accent/dominant color (AC).
- Section 3: Yarn C is the background color (BC), Yarn D is the accent/dominant color (AC).
- Section 4: Yarn D is the background color (BC), Yarn A is the accent/dominant color (AC).
Instructions for Section Repeat
See Color Chart for reference.
Row 1/ Cast on row: With BC, cast on 47 sts. Turn. *On a repeat, this row is a Right Side row – knit in each st across. Turn.*
Row 2 (WS): (BC) K1, purl to last st, k1 in last st. Turn.
Row 3 (RS): Work [(BC) K3, (AC) k1] 11x, (BC) k3. Turn.
NOTE: You’ll have 3 floating sts in the back of your work. It’s recommended to capture the yarn on the 2nd of the 3 sts for a cleaner look, but you can also leave it floating.
Continue following Color Chart until Row 72.
Row 4: (BC) K1, purl to last st, k1 in last st. Turn.
Row 5: (BC) Knit in each st across. Turn.
Row 6: (BC) K1, purl to last st, k1 in last st. Turn.
NOTE: You’ll notice here that your AC color is on the other side of your work. Instead of trying to carry the unused yarn all the way across, you can cut AC at the end of Row 3, leaving a tail for weaving in, and start with new yarn for Row 7.
Row 7: (BC) K1. Work [(AC) k1, (BC) k3] 11x, (AC) k1, (BC) k1. Turn.
Row 8: (BC) K1, purl to last st, k1 in last st. Turn.
Row 9: (BC) Knit in each st across. Turn.
Row 10: (BC) K1, purl to last st, k1 in last st. Turn.
Row 11: Work [(BC) K3, (AC) k1] 11x, (BC) k3. Turn.
Row 12: (BC) K1, purl to last st, k1 in last st. Turn.
Row 13: (BC) Knit in each st across. Turn.
Row 14: (BC) K1. Work [(AC) p1, (BC) p3] 11x, (AC) p1, (BC) k1. Turn.
Row 15: (BC) Knit in each st across. Turn.
Row 16: (BC) K1, purl to last st, k1 in last st. Turn.
Row 17: Work [(BC) K3, (AC) k1] 11x, (BC) k3. Turn.
Row 18: (BC) K1, p2. Work [(AC) p1, (BC) p3] 10x, (AC) p1, (BC) p2, k1. Turn.
Row 19: (BC) Knit in each st across. Turn.
Row 20: (BC) K1. Work [(AC) p1, (BC) p3] 11x, (AC) p1, (BC) k1. Turn.
Row 21: (BC) K1. Work [(AC) k1, (BC) k3] 11x, (AC) k1, (BC) k1. Turn.
Row 22: (BC) K1, purl to last st, k1 in last st. Turn.
Row 23: Work [(BC) K3, (AC) k1] 11x, (BC) k3. Turn.
Row 24: (AC) K1. Work [(BC) p1, (AC) p1] 21x, (BC) p1, (AC) k1. Turn.
Row 25: (BC) K1. Work [(AC) k1, (BC) k3] 11x, (AC) k1, (BC) k1. Turn.
Row 26: (BC) K1, p2. Work [(AC) p1, (BC) p3] 10x, (AC) p1, (BC) p2, k1. Turn.
Row 27: Work [(BC) K3, (AC) k1] 11x, (BC) k3. Turn.
Row 28: (BC) K1. Work [(AC) p1, (BC) p3] 11x, (AC) p1, (BC) k1. Turn.
Row 29: Work [(AC) k1, (BC) k1] 22x, (AC) k1. Turn.
Row 30: (BC) K1, p2. Work [(AC) p1, (BC) p3] 10x, (AC) p1, (BC) p2, k1. Turn.
Row 31: Work [(AC) k1, (BC) k1] 22x, (AC) k1. Turn.
Row 32: (BC) K1. Work [(AC) p1, (BC) p3] 11x, (AC) p1, (BC) k1. Turn.
Row 33: Work [(AC) k1, (BC) k1] 22x, (AC) k1. Turn.
Row 34: (AC) K1. Work [(BC) p1, (AC) p1] 21x, (BC) p1, (AC) k1. Turn.
Row 35: Work [(BC) k1, (AC) k1] 22x, (BC) k1. Turn.
Row 36: (AC) K1. Work [(BC) p1, (AC) p1] 21x, (BC) p1, (AC) k1. Turn.
Row 37: Work [(BC) k1, (AC) k1] 22x, (BC) k1. Turn.
Row 38: (AC) K1. Work [(BC) p1, (AC) p1] 21x, (BC) p1, (AC) k1. Turn.
Row 39: Work [(BC) k1, (AC) k1] 22x, (BC) k1. Turn.
Row 40: (BC) K1. Work [(AC) p1, (BC) p1] 21x, (AC) p1, (BC) k1. Turn.
Row 41: (AC) K1. Work [(BC) k1, (AC) k3] 11x, (BC) k1, (AC) k1. Turn.
Row 42: (BC) K1. Work [(AC) p1, (BC) p1] 21x, (AC) p1, (BC) k1. Turn.
Row 43: Work [(AC) K3, (BC) k1] 11x, (AC) k3. Turn.
Row 44: (BC) K1. Work [(AC) p1, (BC) p1] 21x, (AC) p1, (BC) k1. Turn.
Row 45: (AC) K1. Work [(BC) k1, (AC) k3] 11x, (BC) k1, (AC) k1. Turn.
Row 46: (AC) K1, p2. Work [(BC) p1, (AC) p3] 10x, (BC) p1, (AC) p2, k1. Turn.
Row 47: Work [(AC) K3, (BC) k1] 11x, (AC) k3. Turn.
Row 48: (AC) K1. Work [(BC) p1, (AC) p3] 11x, (BC) p1, (AC) k1. Turn.
Row 49: Work [(BC) k1, (AC) k1] 22x, (BC) k1. Turn.
Row 50: (AC) K1, p2. Work [(BC) p1, (AC) p3] 10x, (BC) p1, (AC) p2, k1. Turn.
Row 51: (AC) Knit in each st across. Turn.
Row 52: (AC) K1. Work [(BC) p1, (AC) p3] 11x, (BC) p1, (AC) k1. Turn.
Row 53: (AC) K1. Work [(BC) k1, (AC) k3] 11x, (BC) k1, (AC) k1. Turn.
Row 54: (AC) K1, purl to last st, k1 in last st. Turn.
Row 55: Work [(AC) K3, (BC) k1] 11x, (AC) k3. Turn.
Row 56: (AC) K1, p2. Work [(BC) p1, (AC) p3] 10x, (BC) p1, (AC) p2, k1. Turn.
Row 57: (AC) Knit in each st across. Turn.
Row 58: (AC) K1, purl to last st, k1 in last st. Turn.
Row 59: (AC) K1. Work [(BC) k1, (AC) k3] 11x, (BC) k1, (AC) k1. Turn.
Row 60: (AC) K1, purl to last st, k1 in last st. Turn.
Row 61: (AC) Knit in each st across. Turn.
Row 62: (AC) K1, p2. Work [(BC) p1, (AC) p3] 10x, (BC) p1, (AC) p2, k1. Turn.
Row 63: (AC) Knit in each st across. Turn.
Row 64: (AC) K1, purl to last st, k1 in last st. Turn.
Row 65: (AC) Knit in each st across. Turn.
Row 66: (AC) K1. Work [(BC) p1, (AC) p3] 11x, (BC) p1, (AC) k1. Turn.
Row 67: (AC) Knit in each st across. Turn.
Row 68: (AC) K1, purl to last st, k1 in last st. Turn.
Row 69: (AC) Knit in each st across. Turn.
Row 70: (AC) K1, p2. Work [(BC) p1, (AC) p3] 10x, (BC) p1, (AC) p2, k1. Turn.
Row 71: (AC) Knit in each st across. Turn.
Row 72: (AC) K1, purl to last st, k1 in last st. Turn.
→ Start from the beginning of the pattern repeat with a new BC and AC. Your previous AC becomes your new BC, and you’ll add in a new AC.
→ Work Row 1 as a “(BC) knit in each st across. Turn.”
→ Repeat Rows 2-72.
→ Continue to work the pattern repeat a total of 4 times. At the end of the 4th pattern repeat, your AC should be the BC you started with.
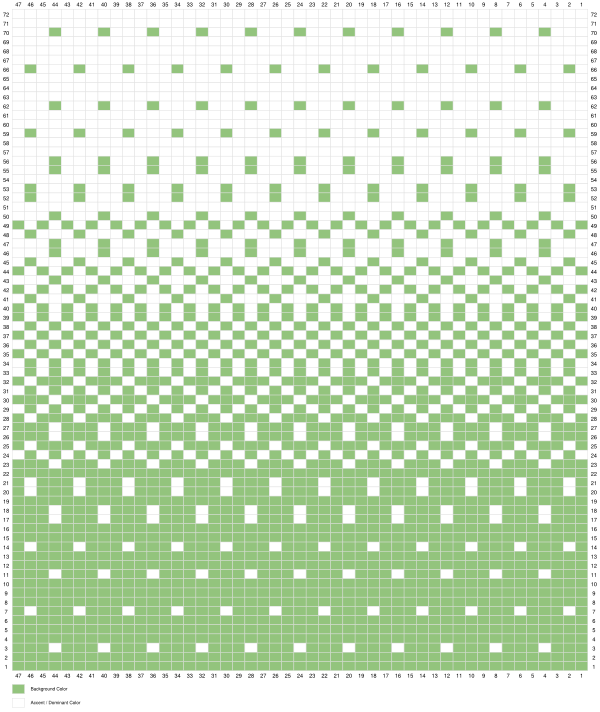
Color chart is created using Stitch Fiddle
Blocking
→ Before continuing below to join the cowl, transfer your live stitches onto a scrap length of yarn.
→ Lay the cowl flat and either wet block or steam block the entire length to minimize curling along the edges.
→ Once fully dry, transfer the live stitches back to your needle and continue below to join the cowl.
Joining the cowl – grafting a live edge to a bound edge
Note: Grafting is also known as the Kitchener Stitch, but in this instance, you are grafting a live edge to a bound edge, not to another live edge. You can find the video tutorial below or on YouTube.
→ Line up your live edge with your bound edge.
→ Cut a long tail from the remaining yarn, approximately 5x the width of the cowl, and thread the tail onto a tapestry needle.
- Insert your tapestry needle purl-wise into the first live stitch, and pull tail through.
- Insert your tapestry needle from right to left under both legs of the first V in Row 2, and pull tail through.
- Insert your tapestry needle knit-wise into the first live stitch and pull tail through, dropping the live stitch from the knitting needle.
→ Repeat steps 1-3 for each live stitch on your knitting needle.
→ Once you’ve dropped the last stitch from your knitting needle, secure and weave in ends.
→ Weave in all ends on color changes.
I know the weaving of ends stinks, but hey, you’re all done! Now all you have to do is sport this light and cozy cowl for the rest of winter!


Thanks! So nice!!! I love it! ????
https://granny-games.com/
Would adding an I-cord edge deflect the curling? Can’t wait to try this!
Very nice scarf. The instructions for making the scarf are quite simple.