
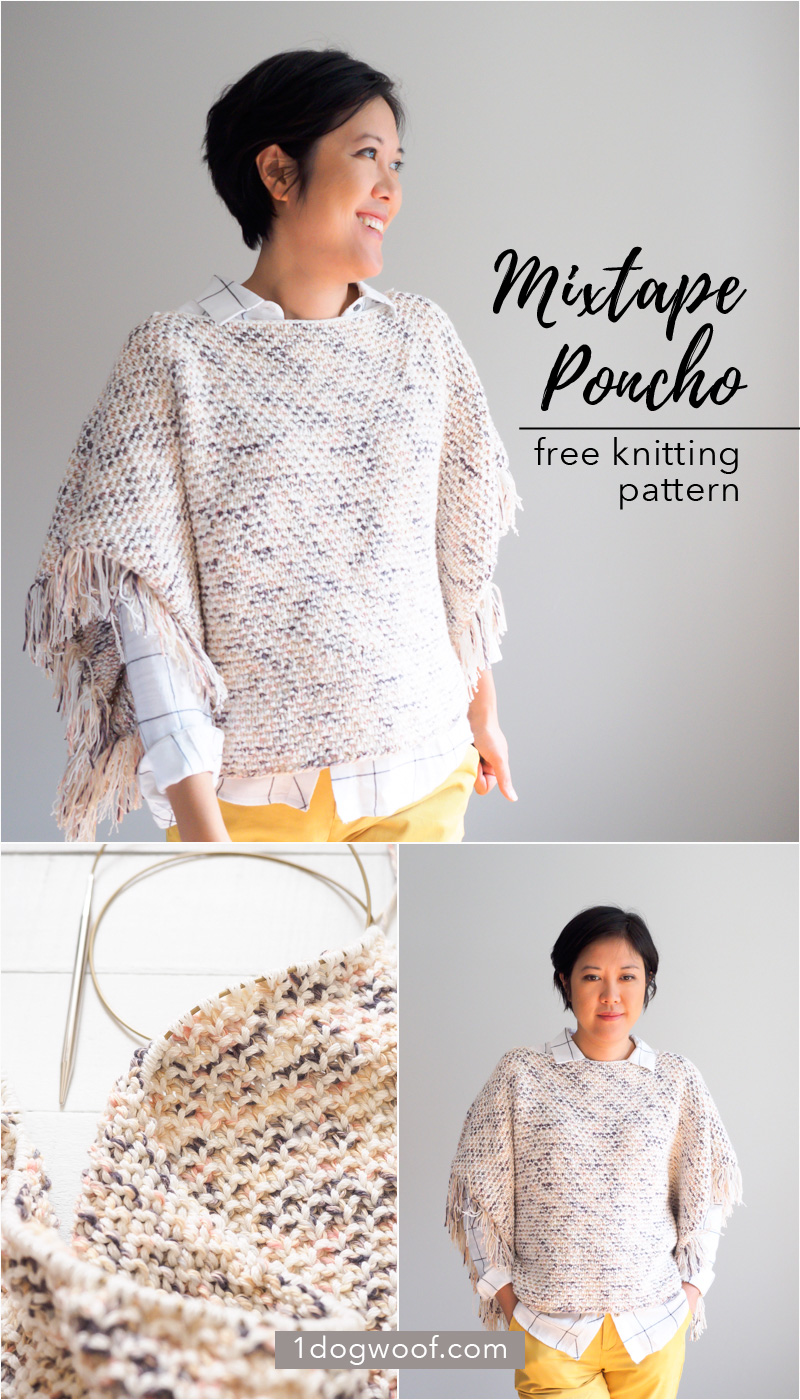
The internet is full of inspiration, and as soon as I saw the Broken Seed Stitch, I knew I needed to use that concept to make something. ANYTHING. It’s such a great looking stitch, super simple yet full of texture and color, which means it’s right up my alley. A few weeks ago, I shared a Broken Seed Stitch inspired Mixtape Beanie, and now, here’s the Mixtape Fringe Poncho.
This project is made in collaboration with Lion Brand Yarn. All opinions and photos are my own. This post may contain affiliate links.
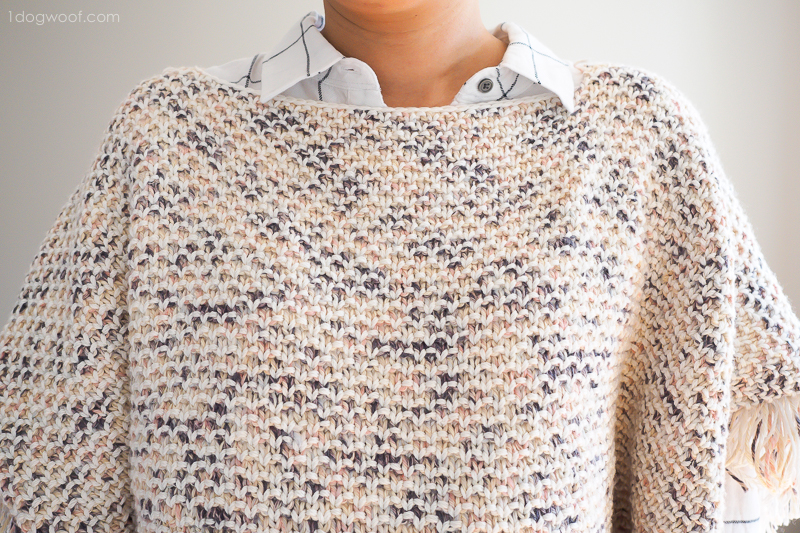
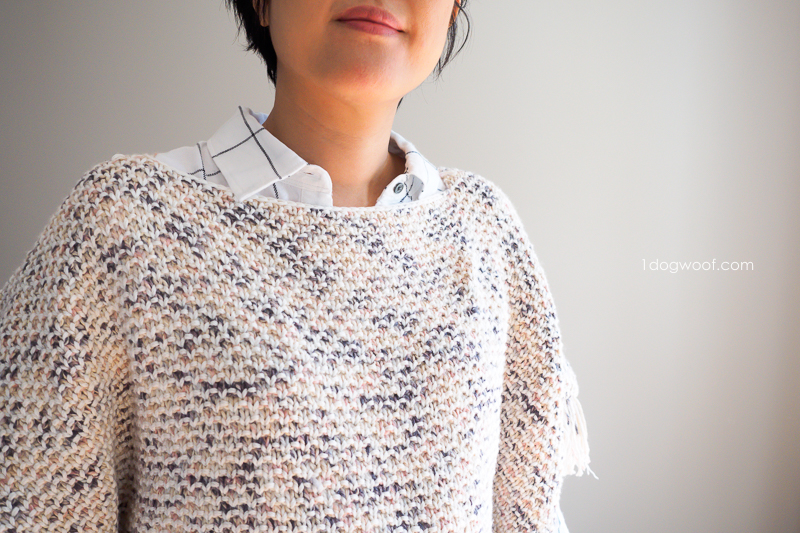
The Broken Seed Stitch is a great stitch to have in your repertoire. Just as the name implies, it’s a normal knitted seed stitch with alternating rows of [k1, p1] and [p1, k1], but now “broken” with an additional row of knit stitches in between each row of seed stitch. This stitch looks great in a single yarn color, but absolutely stunning when you use two coordinating colors to really bring out the “broken-ness” of the texture. From far away it looks almost woven, and closer up, it looks a bit like honeycomb. However you look at it, it’s a sea of amazing texture.
I used two bright colors on my blue Mixtape Beanie and it really brings out the honeycomb texture of the stitch. However, my favorite is using a neutral base against a variegated yarn. If you’re afraid of too much color, or a bit nervous about variegated yarns in general, this is a great way to sort of temper, or dilute the colors a bit with a neutral, so the colored yarn isn’t quite so bold and bright. The neutral base softens the overall effect and almost gives fades the bright colors a bit.
For this project, I used Lion Brand ZZ Twist as my base neutral, and Lion Brand Flikka yarn as my variegated color. I also doubled up on each yarn to make it a bit more chunky….and allow me to finish this before my kids all head off to college! By doubling up on the Flikka yarn, there’s even more variation in the pattern, since you’re using 2 different strands of yarn that are changing colors at different times. I love the completely random color patterns this makes! Lion Brand has several different Flikka colorways, and I think they’d all look great paired up with a light neutral.
Since the Flikka is a cotton yarn, I chose the ZZ Twist as the main neutral base because I wanted a cool-touch yarn. This is definitely a no-fuzz garment. The ZZ Twist is a lightweight CYC 4, and it’s also doubled up to give it more heft. It’s just slightly lighter than the Flikka, but ended up working really well together.
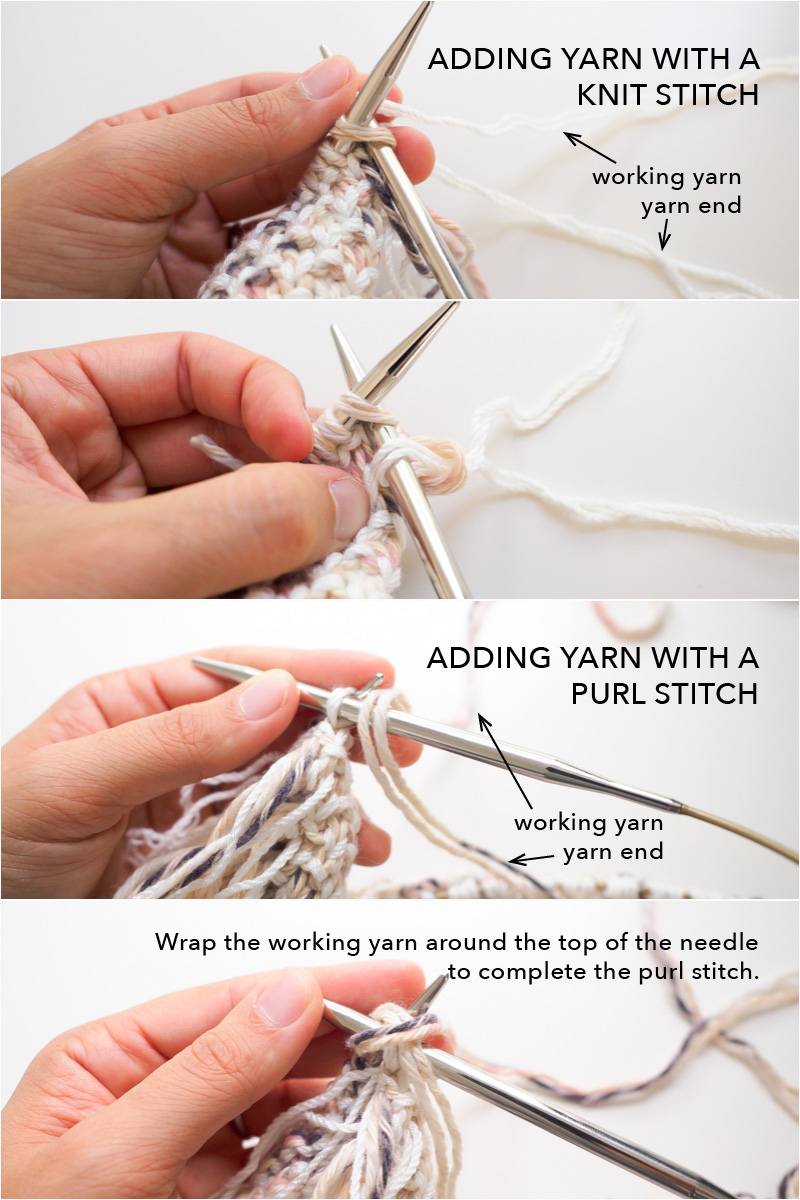
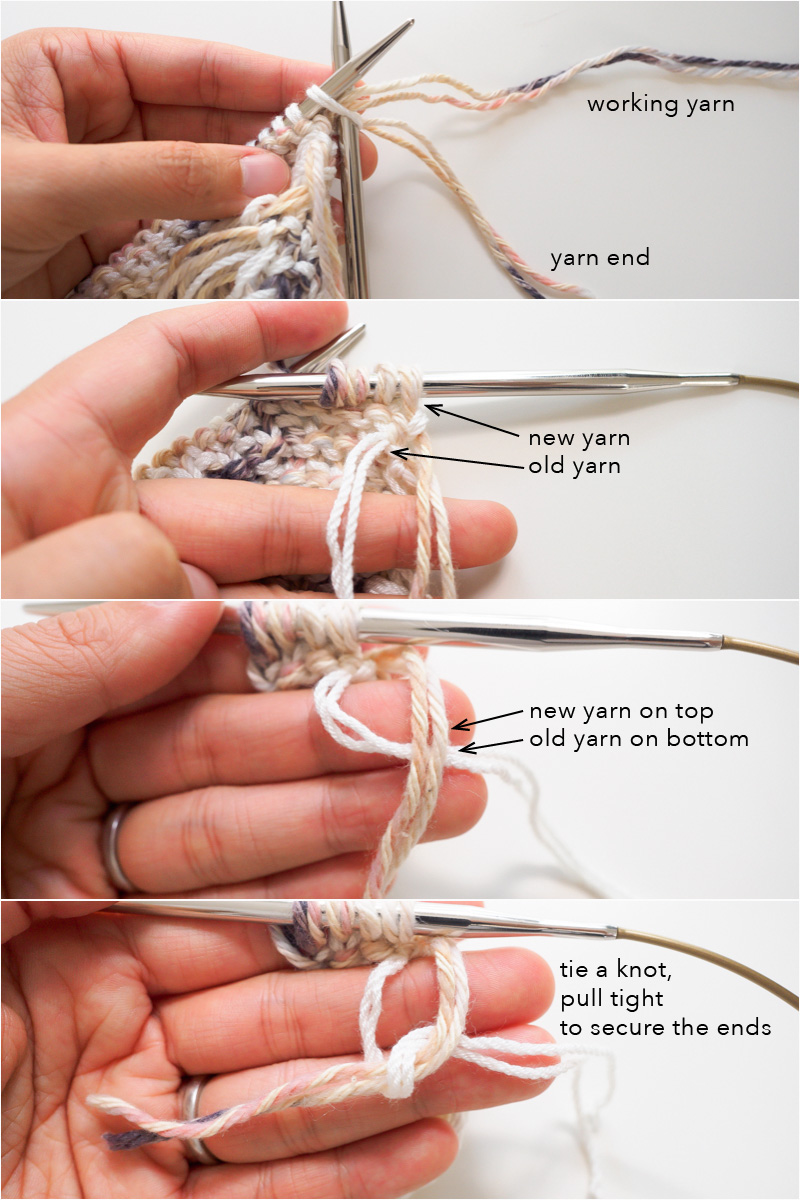
If you’re working the Broken Seed Stitch with 2 colors, you’ll need to switch colors every row. It’s easy when you’re working in the round and can pull up a color and drop a color, but gets almost mind-blowing fussy when you’re working flat, since you’d have two loose ends for every row. So instead of weaving in all those ends, they’ll be tied together and used as fringe instead!
The construction of the poncho is very straight-forward; it’s a simple rectangle with a hole for your head! The boatneck collar has a few rows built in so it’s not just a slit, and that means the collar will sit a bit lower on your neck too. The sides of the poncho are seamed together, about 4″ in from the sides, to create loose arm holes. The poncho is meant to be loose and casual, so the placement of those side seams don’t need to be exact, and if you prefer open sided ponchos, don’t need to be there at all! I found the seams are useful in helping to keep the front and back even though. Working 2 strands of yarn at a time with this pattern creates a dense and somewhat heavy fabric, which may slip too far front or back without a side seam to help hold its shape.

Since you probably won’t be making this poncho in one sitting, and you’ll cut your yarn after every row, how do you know where to start again? You can always mark the needle where you end, and then start with that end when you pick it back up. Or, you’ll notice that the Main Color (ZZ Twist) is always worked on the right side of the work, where you see the honeycomb. The Flikka or variegated yarn, is always worked on the wrong side of the work. Any time you pick up your work, just take a look at what the last yarn used was, and you’ll know which side and which yarn to start with.
If you’re picking up the variegated yarn and can’t remember whether it’s a [p1, k1] row, or a [k1, p1] row, take a look at the 3rd stitch from the edge of the main color yarn from the previous row. If you see a V, then start with a k1. If you see a bar, then start with a p1. Then work a few stitches, and check to make sure you’re staying on the seed stitch pattern.
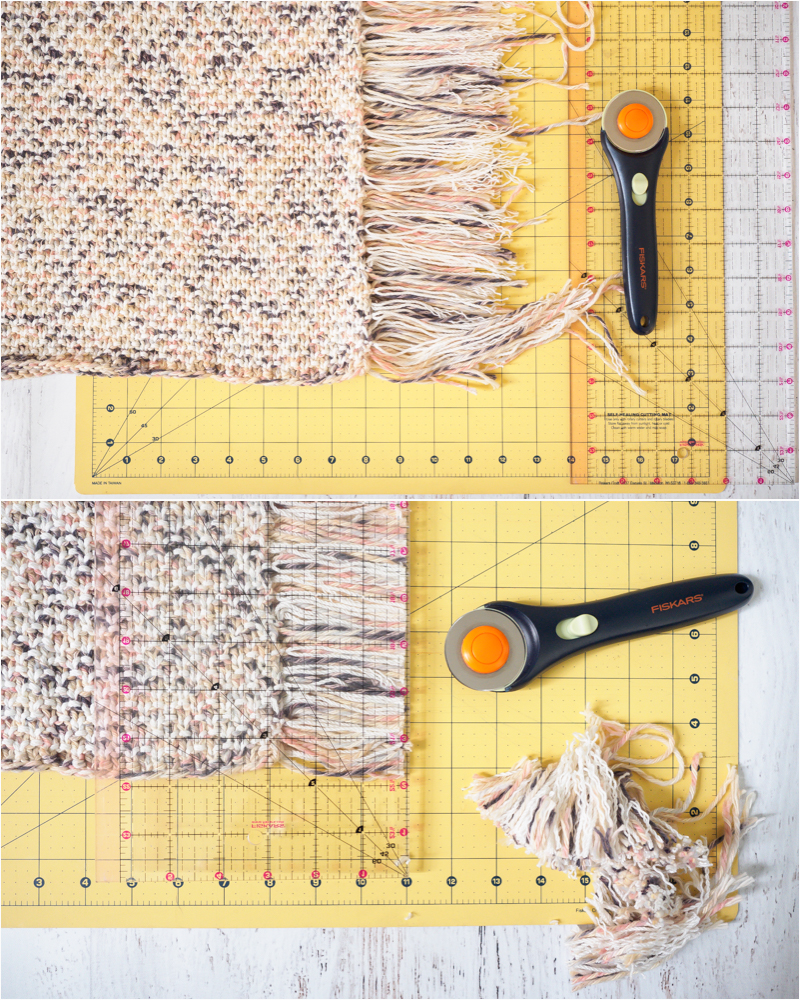
Here’s another little hack on cutting your fringe. Each of your ends should already be approximately 4″ long. You’ll want to go through and double knot each set of ends to another set of ends as you make the rectangle. I like to tie the ends of the previous row to the end of the yarn I just added to my work. But it’s best to tie another knot to really secure those ends. Then lay the piece on a cutting mat, and brush out the fringe so they all lay flat. Hold all the fringe down with a quilters ruler, and cut with a rotary cutter. Voila! Super straight fringe! You can clean up stragglers with a pair of scissors, but let a rotary cutter do the bulk of the work!
The pattern below is for size S; I made it for myself so it’s sized for a 34″ bust. There’s a lot of positive ease in it, so it probably works for a Medium as well. Instructions for other sizes are available in the PDF available for purchase in my pattern shops. This garment is a simple shape, and if you prefer to size it yourself, I’ve included some sizing recommendations below.
——————————————
Add this project to your Ravelry queue
——————————————
If you like this poncho, you may also like the Catalunya Colorblock Poncho. It’s another easy knit and great for beginners!

Supplies
- MC: 4 skein of Lion Brand ZZ TWist Yarn (3.5oz/100g, 246yds/225m)
- C1: 6 skein of Lion Brand Flikka Yarn (3.5oz/100g, 196yds/179m)
- 60″ US 10/6.0mm circular knitting needles
- scissors
- tapestry needle
- blocking mats
Abbreviations
- st(s) – stitch(es)
- k – knit
- p – purl
- MC – main color
- C1 – alternate color
Project Notes
- Skill level: Advanced Beginner
- Gauge: 13.5 sts and 23 rows in 4 inches.
- Dimensions: 20.5 in long and 35.5 in wide.
- If you’d like to customize your own sizing, you’ll need to cast on an EVEN number of stitches for the width of the poncho and take into account how much you want it to drape on your arms. Then work the Broken Seed Stitch to get the desired length up to the neckline. At the neckline, subtract the size of the boatneck, and divide the remaining number of stitches by 2. For the first collar row, you’ll work those calculated shoulder stitches (add 1 because that last stitch will travel down to the end), cast off your boatneck stitches, and work the other should stitches. From there, works a few rows to create the boatneck. When you’re ready to join the shoulder pieces and start the back, cast on the same number of stitches you had cast off earlier, and pick up the stitches on the far shoulder. Then continue working in rows until your back piece is the same length as your front piece. Your cast off row should line up with your cast on row.
- Unless otherwise noted, cut yarn at the end of each row, leaving a 4″ tail, and turn your work.
Mixtape Fringe Poncho Pattern Instructions
Row 1: With C1: Cast on 120, leaving a 6″ tail at the beginning. Turn your work, do not cut the yarn.
Row 2: (wrong side row) With C1: [k1, p1] across.
Row 3: (right side row) With MC: k1 across.
Row 4: With C1: [p1, k1] across.
Row 5: With MC: k1 across.
Continue Rows 2-4 until piece is approximately 20.5 in (117 rows). Should finish on Wrong Side row.
Row 119: With MC: k43, cast off 36, k41.
Row 120: With C1: [p1, k1] across on either side of the split until last st, p1 in last st.
Row 121: With MC: k1 across on either side of the split.
Row 122: With C1: [k1, p1] across on either side of the split until last st, k1 in last st.
Row 123: With MC: k42, cast on 36, pick up and knit remaining 42 sts.
Row 124: With C1: [p1, k1] across.
Row 125: With MC: k1 across.
Row 126: With C1: [k1, p1] across.
Row 127: With MC: k1 across.
Continue Rows 124-127 until piece is approximately 20.5 in (117 rows total). Should finish on Wrong Side row. Do not cut yarn on last Wrong Side row.
Row 241: With C1: Bind off.
Fold the piece over so that the boatneck is at the top.
Optional: Use the mattress stitch method to add a 9″ side seam, approximately 4″ in from the edge of the poncho. Seam length does not need to be exact.
Double knot the row ends and cut evenly for fringe.

I hope you enjoy this pattern! If you do make one, please share it with me on social media using the hashtags #1dogwoof and #mixtapeponcho!
Check out my pattern shops on Ravelry and Etsy where you can purchase printable PDFs of my latest crochet patterns. These PDFs are formatted without comments or ads, and have instructional photos at the bottom for optional printing.
I sometimes include affiliate links in my supply lists. Purchasing from these merchants earns me a small commission with no extra cost to you, and goes towards supporting One Dog Woof.
Please be respectful and do not sell or distribute this pattern in any way, especially as your own. Instead, share the original blog post link! You can sell finished products made from this pattern by giving credit to One Dog Woof as the pattern designer and linking to the blog post. If you have any questions regarding distribution or translation of this pattern, please see my Terms of Use. Thank you for your consideration!


0 Comments