
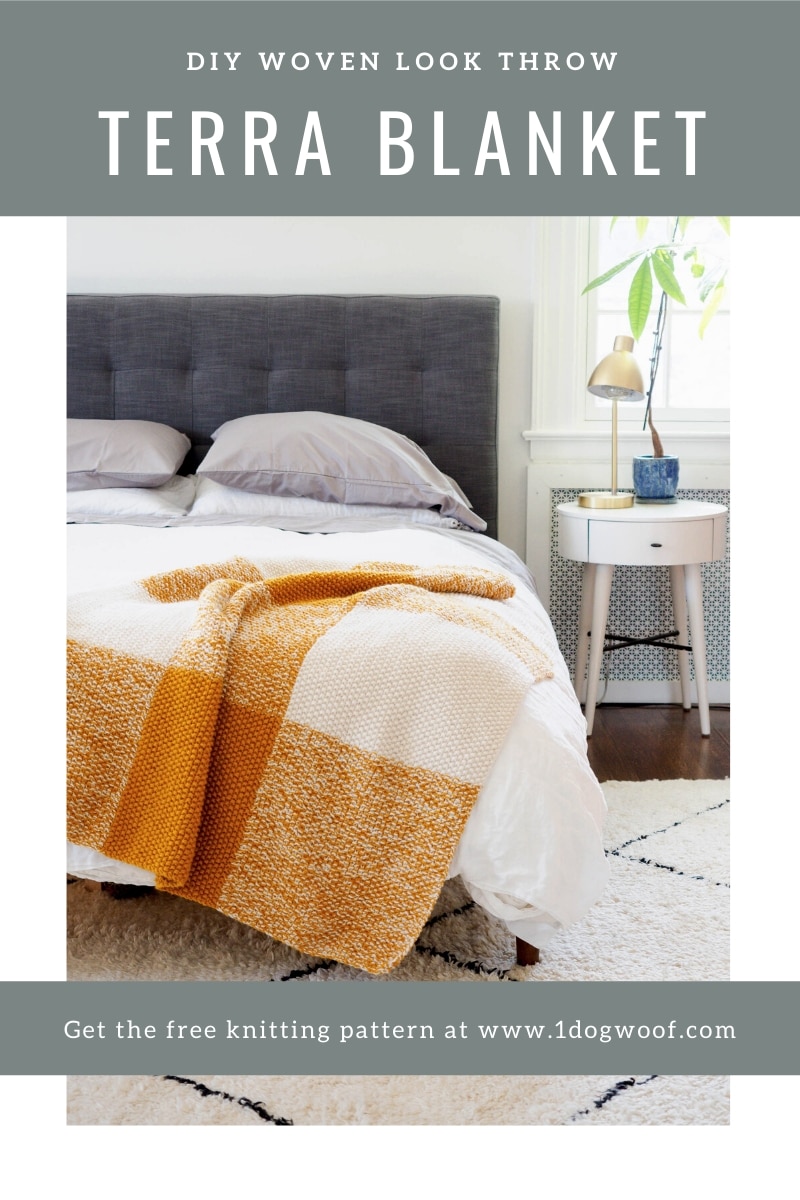
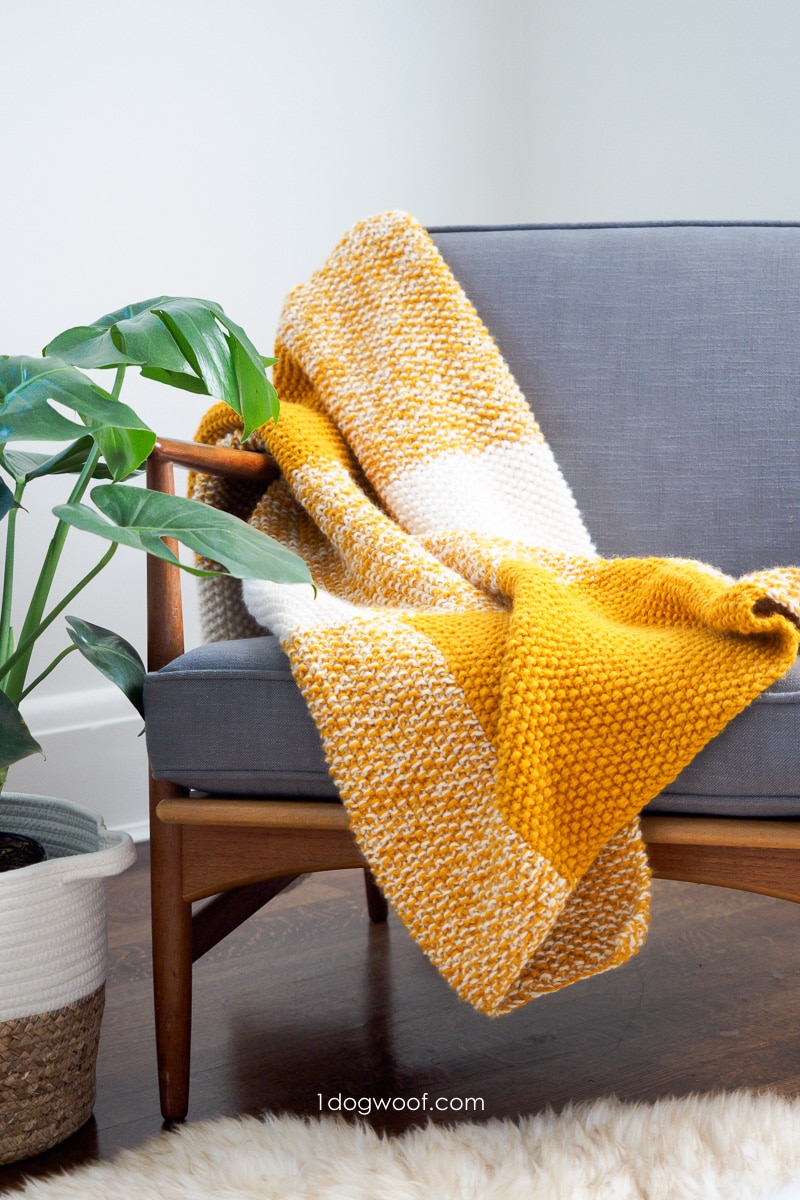
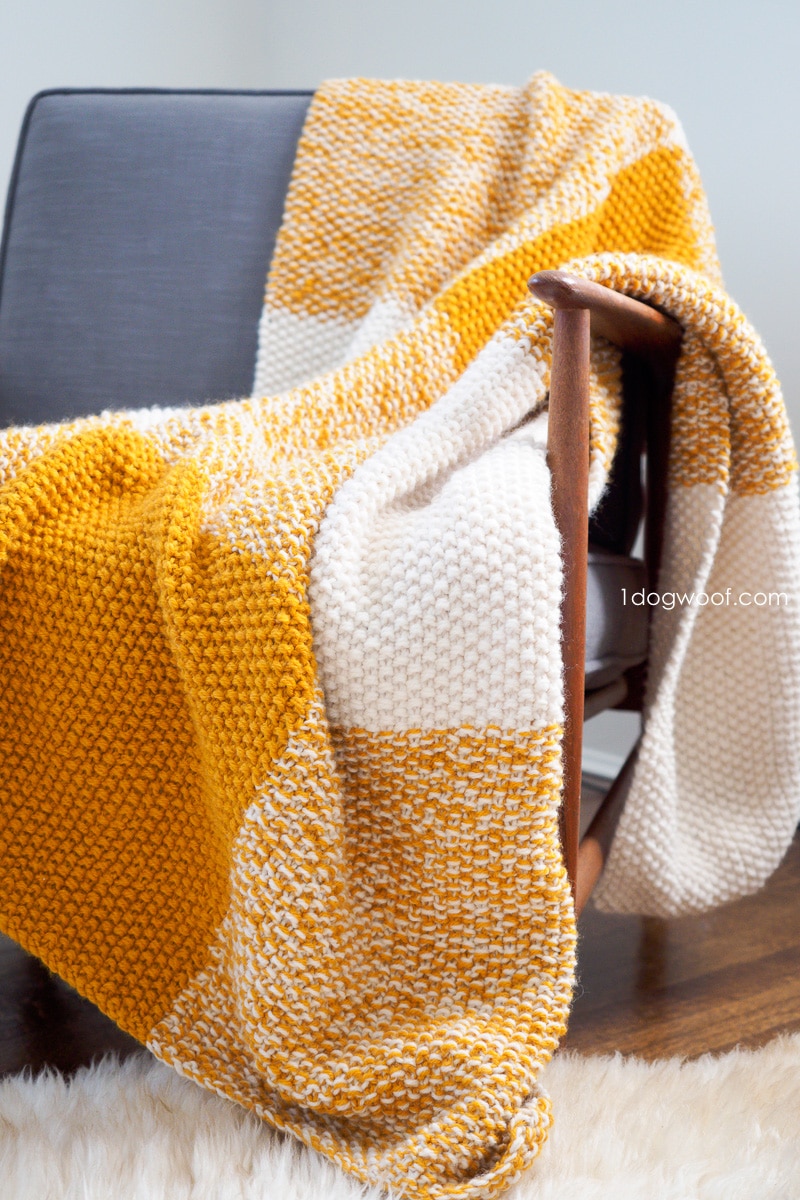
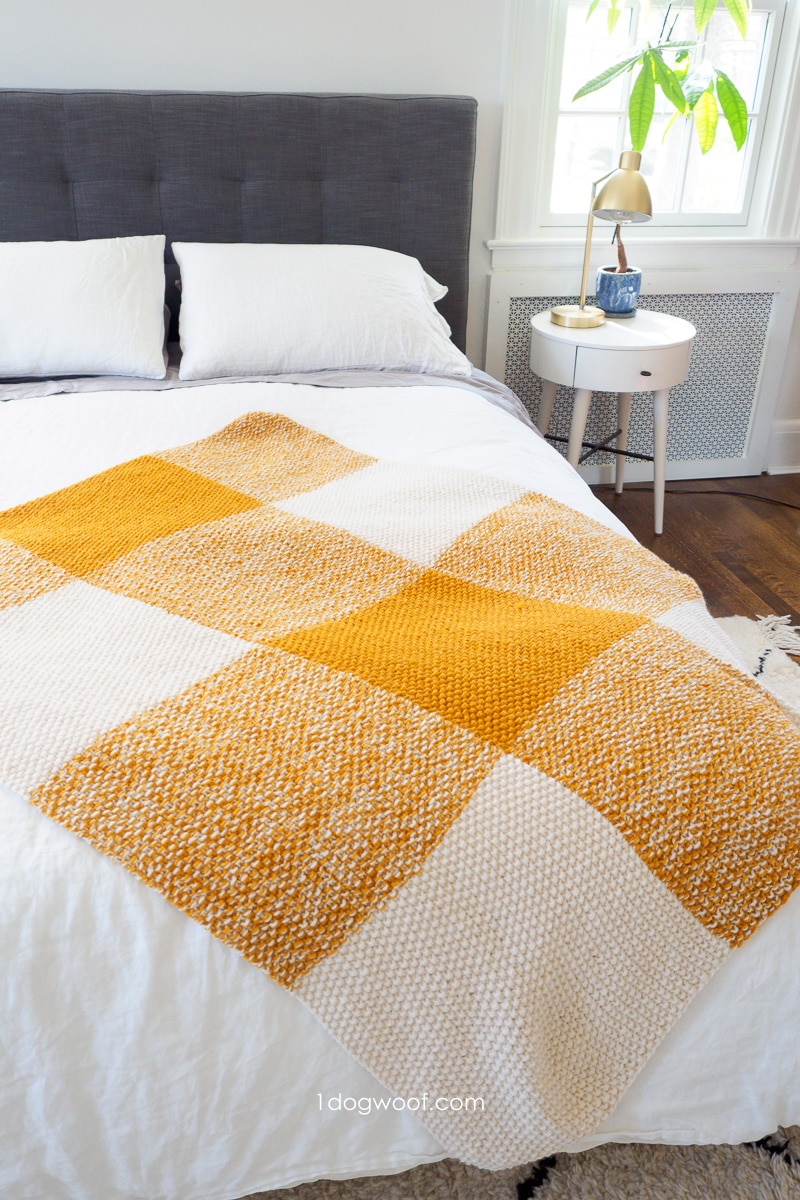
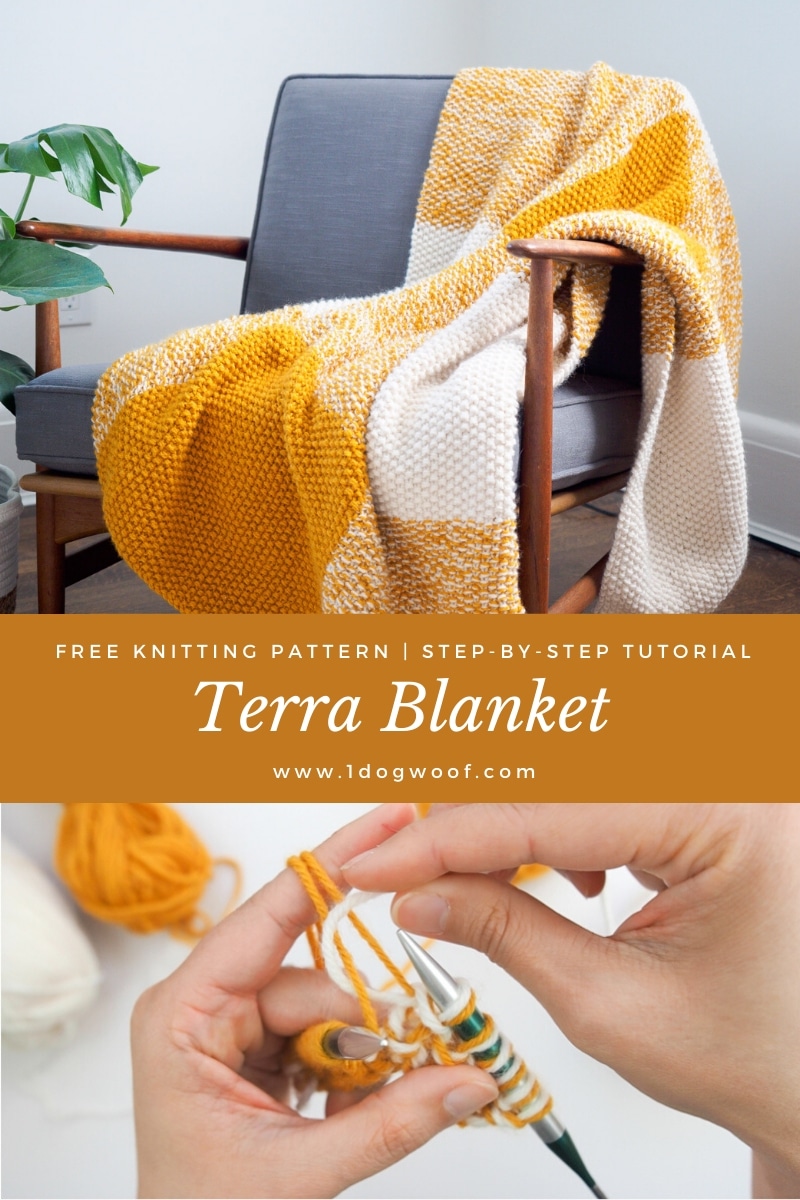
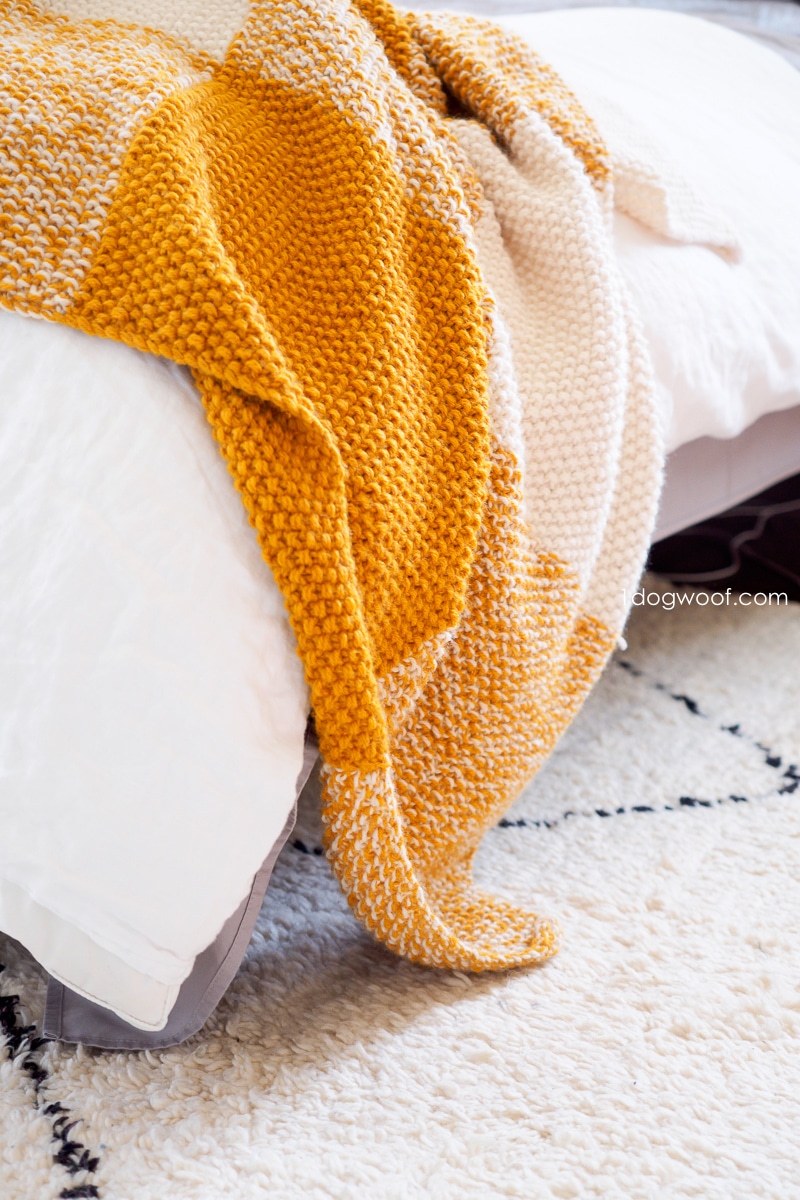
Keep things bright and simple in your home with this modern buffalo plaid knitted blanket. It’s got just enough color to add an accent to a room without feeling too busy. Unlike a quilt, the Terra Blanket is knit up in rows, not pieced together as blocks, which means there’s no seams!
Every time I got to a home decorations store, whether it’s HomeGoods or WestElm or Pottery Barn, I look at their blankets and think “I can make those!”, but I never do. For some reason, I always feel I need to add some level of complexity to my own projects. But why, really? Why can’t we get back to basics and use our skills to make something that shines because of its simplicity?
Keeping it to two colors and two knit stitches is the Terra Blanket. This knitted blanket features big blocks of color that form a basic buffalo plaid pattern. It’s worked up in the knit seed stitch, making it a really great project to work on while letting your mind wander. The repetitiveness of the stitches is often why people find knitting so meditative and calming, and the Terra Blanket is soothing in both is stitches and the fact that it functions as a blanket even while you work on it!
Get the Pattern
Scroll to the bottom to get the free pattern for the buffalo plaid Terra Blanket.
Purchase the downloadable and printable Terra Blanket PDF from Ravelry. The PDF is formatted with all the information included in this post, and is perfect for offline use.
You can also grab a complete Terra Blanket Knit Kit from Lion Brand Yarn that contains the yarn and a digital copy of the pattern.
Yarn and Needle Choices
A woven plaid is the mixture of 2 strands of color, one moving horizontally and one moving vertically. The Terra Blanket uses the same concept, knitting with 2 strands of yarn together and switching colors to create either the solid or marled effects. Knitting with 2 strands of yarn in seed stitch will make your blanket feel extra thick, so unless you’re looking for a chunky blanket, you’ll want to choose a light-worsted or DK weight yarn.
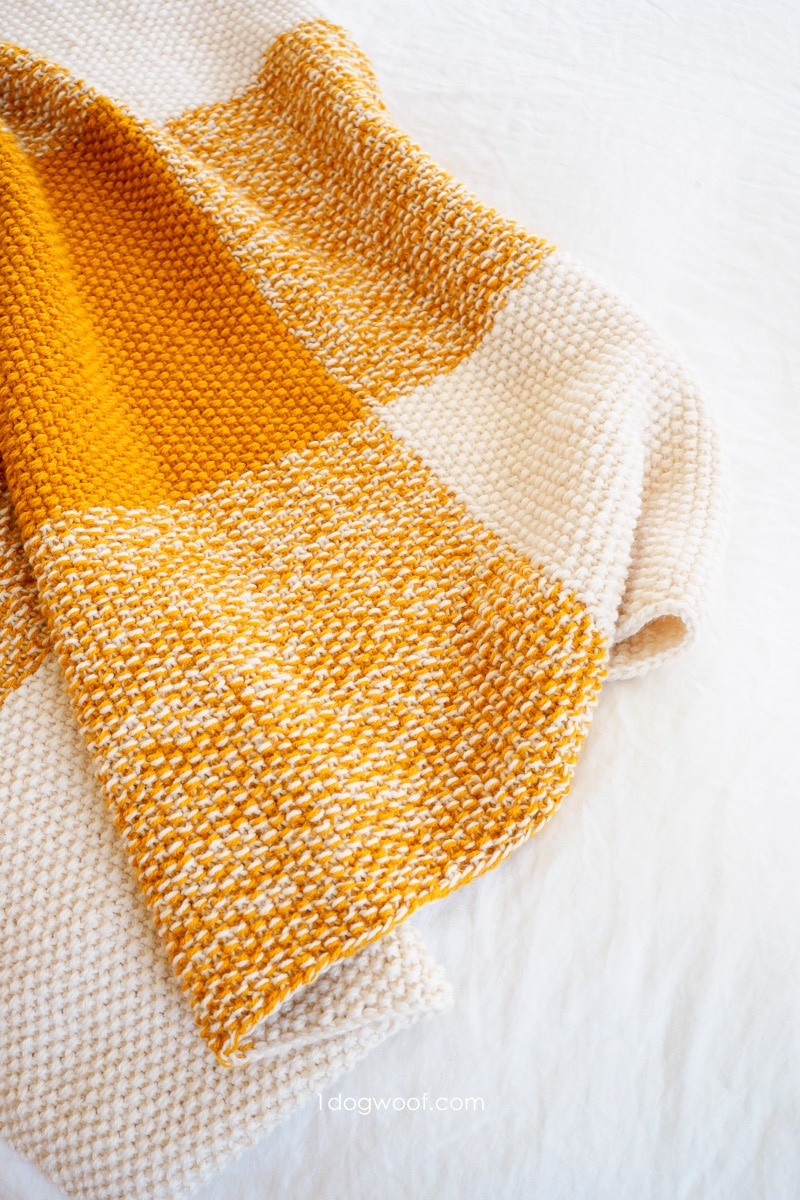
To create the buffalo plaid effect, it’s best to pick a single color and pair it with a neutral like cream or white. Use black and white yarn to produce a gray when mixed, or a red and white combination to get a pink color in the middle. I chose yellow as my accent color and love the twisted effect when mixed with a cream.
For this project, I used Lion Brand Wool Ease, which is a 4-ply worsted weight yarn, but I find it to be lighter than other yarns in the same category. There’s a beautiful selection of colors available, many of which work well with its cream colorway.
The other choice you need to make for your project is the size of your knitting needle. Remember that you’re doubling up on your yarn, so you’ll need a thicker needle that what is recommended for that yarn. You’ll also want to pick a needle size that will give you blanket plenty of airiness and drape, since a seed stitch can often look and feel tighter than a regular stockinette stitch.
Lion Brand recommends 5mm needles for their Wool Ease yarn, but I increased to 8mm circular needles and knit with a loose tension so that the blanket has a beautiful drape and lightness.
Double Stranded Colorwork Construction
When working with blocks of color in a buffalo plaid blanket, you can choose to work each square separately and seam them together. This is how crochet granny square blankets are made. Or you can choose to knit the blanket in one piece, switching colors when necessary to create the color blocks. The Terra Blanket is knit row by row, so there is some colorwork involved.
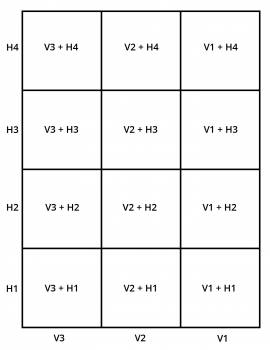
The buffalo plaid is made up of 3 sections of color across the short side of the blanket, and 4 sections of color along the long side of the blanket, for a total of 12 squares. One strand will be the horizontal color, and one strand will be the vertical color. Starting from one of the short sides, we see that a single horizontal color (H1) is paired with 3 different vertical colors (V1, V2, V3). When we finish the first quarter of the blanket, we’ll switch out the H1 horizontal color for the H2 color, but the vertical colors stay the same. So at any point, we are only changing one strand at a time.
It’s important to keep your colors separated and organized, especially since in the solid squares, your vertical and horizontal strands are the color. You’ll need to know which one to switch out in the middle of row for the next vertical color.
Changing Colors Mid-Row
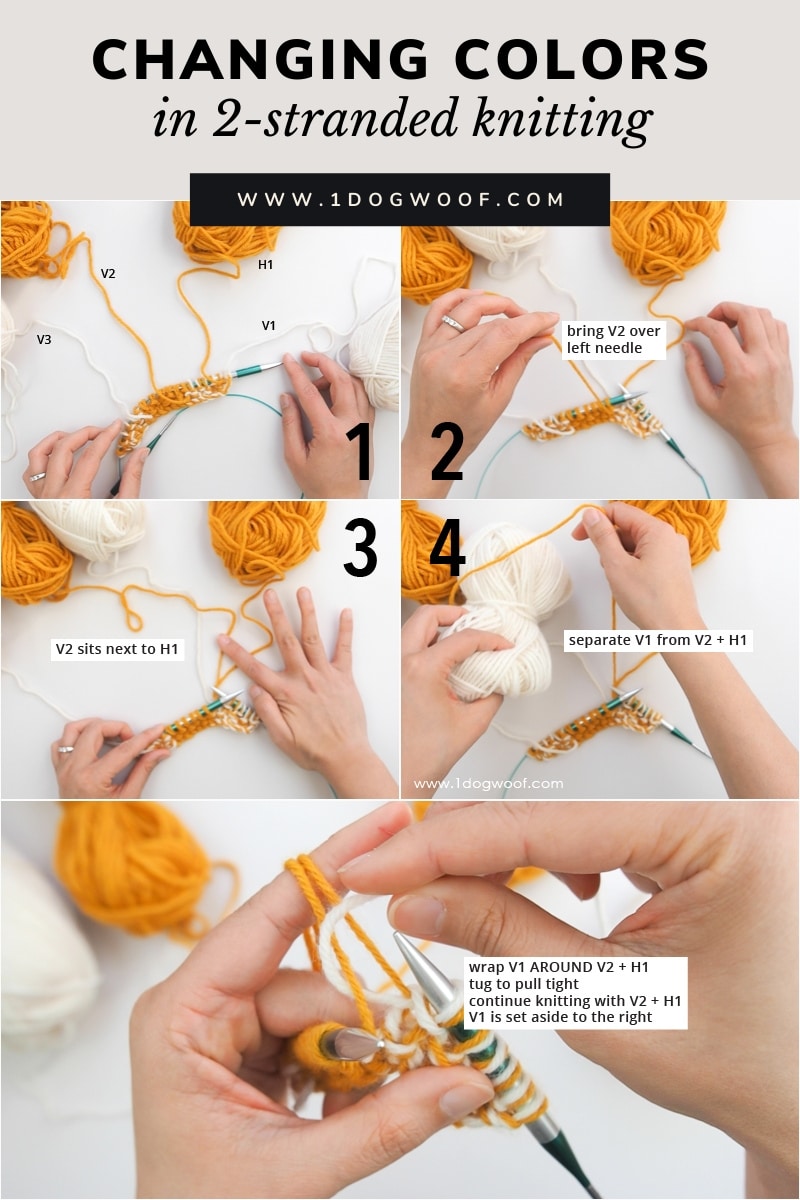
For those unfamiliar with knitted colorwork, there is one rule you have to keep in mind. When you change colors, you have to cross your yarns so that there is no hole at the change point. That’s usually pretty simple to keep track of when you’re working a single strand of yarn and changing colors to another single strand of yarn. But what happens when you’re working with 2 strands of yarn and only need to switch out one of them?
First, always know which is your horizontal strands, and which are your vertical strands. I like to work with separate balls of yarn. Keep your 3 “V” balls next to each other but set your “H” ball a bit apart. At any stitch, you’re working with a combination of an H, plus a V. Every time you change color in a section, the horizontal skein stays the same, and you’re only changing the vertical skeins.
Second, always untwist your H + V strands before changing colors. As you knit, those two strands will twist together no matter how hard you try to keep them untangled, so you’ll need to untwist them to prevent ugly clumps in the middle of your blanket. This adds a bit of extra work, but it becomes part of the repetitive and meditative process.
Once your 2 yarns are untwisted, pair up your H yarn with the NEW V yarn. Then, take the old V yarn, and wrap it around the new H + V pair. This gives that intentional cross in the yarns and interlocks them to prevent holes at the color change point. Now you can set your old V yarn aside, and continue knitting with your new H + V pair until the next change point.
I know, it sounds tedious, as often knit colorwork can be. This buffalo plaid knitted blanket is not a 2 hour project. It is a project that you work on little by little, when your mind is worn out at the end of the evening or when you need to pay attention to other things and can’t focus on counting stitches. Over time, the yarn change becomes familiar, and less onerous. Plus, the finished blanket at the end is absolutely worth the work you put in. It is by far my favorite blanket so far in its usability and seasonality.
Turning Rows
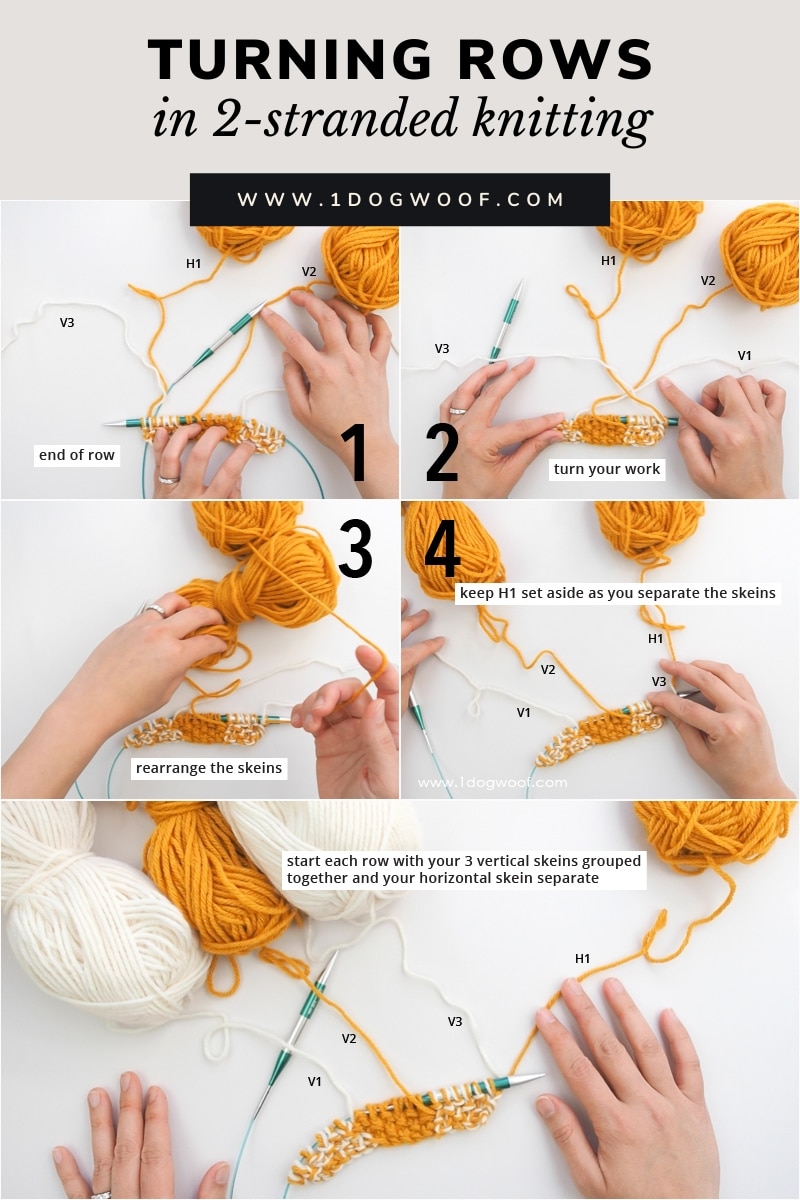
The next big yarn switcheroo comes at the end of every row. You’ve worked your way across 3 sections, and now you need to turn the blanket over and knit from the other side. When you turn, all your yarn strands cross over on themselves. Before you start your next row, make sure to uncross your balls of yarn and set them out straight to minimize any tangling. On the return row, you should be able to pick up your vertical skein yarn right where you left off on the previous row.
This is also why it helps to keep your horizontal yarn ball separate from the 3 vertical yarn balls. You’ll need to uncross the 3 vertical balls of yarn, but the horizontal one sort of supercedes the others.
When you run out of a ball of yarn, simply join the next ball with a small knot to continue working. The knot will be hidden among the seed stitch and be nearly invisible.
Tips for Managing Multiple Yarn Balls
Working with 4 yarn balls (1 H + 3 V balls) in a single row is no easy feat. Here are a few ways to make your life a little easier for you need to put your blanket down and pick it back up again:
- Store your project in an organizer like this Mollie Ollie Premium Diaper Caddy. The velcro dividers in the caddy are perfect for keeping your horizontal yarn separate from your vertical yarns. I put my 3 balls of Lion Brand Wool Ease along the zipper side of the caddy, and the one ball for my horizontal strand in a separate compartment behind it. When I turn rows, I can easily uncross the 3 balls of yarn in the front compartment. When I change colors, I always know which is my horizontal ball of yarn. Having the zipper pocket face me also helped me store my hook, scissors, pencil, and tapestry needle whenever I needed to walk away from the project.
- If you don’t have a compartmentalized caddy, a simple basket can also work. It’ll a little harder to keep track of your H yarn versus your V yarns, and even more important to keep your yarns tidy as you work.
- For colorwork in general, you can keep your balls on separate bobbins on a bobbin holder, or feed your yarn through the individual openings in the Jimmy Beans Wool Oh Snap project bags. Both of these options organize the yarn linearly, which works great when the yarn balls can stay on the bobbins. However, it works less well for this particular project because the balls have to be picked up and untwisted, so keeping the balls loose will be easier.
Terra Blanket Pattern
Supplies
- 14 skeins of Lion Brand Wool Ease yarn (3oz/85g, 197yds/180m)
- 8 skeins of MC (White), total yardage: 1576yds/1441m
- 6 skeins of C1 (Yellow), total yardage: 1182 yds/1081m
- Size 11/8mm 32” or longer circular knitting needles (Adjust as necessary to obtain correct gauge)
- Scissors
- Tapestry needle
Gauge
12 sts and 19 rows in 4 inches of stockinette, unblocked
Finished Size
42” / 106.75cm wide x 56” / 142.25 cm long
Abbreviations
- st(s) – stitch(es)
- K – knit
- P – purl
Pattern and Construction Notes
- The blanket is worked back and forth in rows, turning at the end of each row.
- You will have 3 VERTICAL skeins – V1, V2, V3, and 4 HORIZONTAL skeins – H1, H2, H3, H4.
- V1 and V3 are White (MC), V2 is Yellow (C1).
- H1 and H3 are White (MC), H2 and H4 are Yellow (C1).
- At all times during blanket construction, you will have 4 active balls of yarn.
Terra Blanket Pattern Instructions
Cast on 42 using the cable cast-on method, holding V1 + H1 together. Change to V2 + H1, cast on another 42 sts. Change to V3 + H1, cast on the last 42 sts. You should have a total of 126 sts cast on.
1st Section
Row 1: Holding V3 + H1 together, work [k1, p1] 21 times. Change to V2 + H1, work [k1, p1] 21 times. Change to V1 + H1, work [k1, p1] 21 times. Turn at the end of each row.
Row 2: Holding V1 + H1 together, work [p1, k1] 21 times. Change to V2 + H1, work [p1, k1] 21 times. Change to V3 + H1, work [p1, k1] 21 times.
Continue working in seed stitch back and forth in rows for 66-68 rows, or until length measures approximately 14”/35.5cm.
Cut H1 at the end of the last row in the section, leaving an 8”/20cm tail for weaving in.
2nd Section
Join H2. Hold H2 + vertical skein together and continue working in seed stitch pattern, changing vertical skein every 42 stitches.
Work 66-68 rows or until the 2nd section measures approximately 14”/35.5cm.
Cut H2 at the end of the last row in the section, leaving an 8”/20cm tail for weaving in.
3rd Section
Join H3. Hold H3 + vertical skein together and continue working in seed stitch pattern, changing vertical skeins every 42 stitches.
Work 66-68 rows or until the 3rd section measures approximately 14”/35.5cm.
Cut H3 at the end of the last row in the section, leaving an 8”/20cm tail for weaving in.
4th Section
Join H4. Hold H4 + vertical skein together and continue working in seed stitch pattern, changing vertical skeins every 42 stitches.
Work 66-68 rows or until the 4th section measures approximately 14”/35.5cm.
Bind off in seed stitch pattern, changing yarn color every 42 stitches.
Cut all yarn, leaving 8”/20cm tails for weaving in.
Weave in all ends.


Thank you for this wonderful tutorials, it is really great to read from your blogs, I learn so much about knitting.
I am looking forward to making this blanket. Is it possible to use a single strand of yarn on smaller needles (5 mm) and if so how many stitches would need to be cast on to get the same finished size. Thank you for your help.
Is there a video you recommend for the strand work and is this considered double knitting?
I love this kind of blankets and the patterns are awesome!
This is a gorgeous blanket. I would love to do crochet a buffalo plaid.
What if you want to make this a 4 by 5 square blanket instead of 3 by 4?
Any way to get instruction for that and the amount of yarn needed?
Newbie question: how big is the gauge supposed to be?
Oops. My mistake. I misread the above on the gauge. Thanks!
THIS IS THE BEST BLANKET EVER.
This was my first big knit project. The pattern was super easy to follow and the pictures really helped too.
I’m impatiently waiting for more wool-ease colors to be restocked so I can make another!
Beginning knitter here, and I’m working on my first baby blanket. Colorwork seems way outside my skill level at this point, but you inspire me to keep learning!